Chameleon Falls
Glen Onoko Falls is one of the more well-known waterfalls in the Pocono Mountains of Pennsylvania. There are three named waterfalls along the trail, and then some optional trails that you can take if you’d like to reach some vistas and overlooks.
I’d read a lot about this trail in the past year or so, but until May of this year I had never been there myself. The Glen Onoko Falls Trail is known as being treacherous and dangerous, in addition to incredibly beautiful. I was interested to see and experience the trail for myself because there are some mixed messages out there. In many places you’ll read that it is dangerous. And then on some blogs and sites you’ll read reviews from people who hiked the trail with young kids. So is it dangerous or family-friendly?
In my opinion the trail is not dangerous unless you venture onto the rocks where you shouldn’t be, like the top of a waterfall. The trail is more physically challenging than dangerous, although you do need to be careful and respect the potential hazards. The only concern I had on the trail was making sure that I didn’t get lost, and that only applied to the section beyond the waterfalls. However, people have died on this trail. Several in recent years actually. On one news website I saw that 4 separate rescue attempts had occurred in a single week. So there is danger if you are not careful.
Regardless of whether you think this trail is dangerous or not, there is no denying that it is extremely beautiful. I’ve been to a lot of the popular destinations in this area of the country, and Glen Onoko is right up there with the best. It has a reputation for being one of the best places in the Poconos, so I had high expectations, and I was still pleasantly surprised by just how amazing it is.
For anyone who is living in the area or traveling anywhere near the area, I definitely recommend a trip. On this page I’ll go through the details of the hike to help with your own planning.
→ See More of The Best Places to Photograph in Pennsylvania
The Basics of the Glen Onoko Falls Trail
The trailhead and parking area is within Lehigh Gorge State Park. However, pretty much as soon as you start the trail you will be leaving the state park and entering State Game Lands 141. The significance of this is that the trail is not maintained by the state park. It’s very rugged, and in some places it is not much of a trail at all. I had read that it is poorly and inconsistently blazed, but as of May, 2017 the trail up to the falls was pretty well blazed (orange blazes). I think that had been done recently, so hopefully it continues to be well-marked in the future.
There are a few different options. The trail leads up to three waterfalls. It is a steep incline and Glen Onoko Run tumbles beside the trail most of the way. There are endless cascades in addition to the three named waterfalls. After the third waterfall you can 1) head back down the trail, 2) take a small change of course and hit a return trail that leads back to the parking lot, or 3) continue on a few different options to extend the hike.
If you are just interested in seeing the 3 waterfalls, the hike is less than a mile each way. However, it feels longer because it’s steep almost the entire way, and you’ll be stopping a lot to take photos. It’s a slow hike because you have to watch your footing much of the way.
I chose to extend the hike to reach a few vistas. I eventually reached Oxbow Bend before turning around and heading back to the parking lot. The hike I took was a little less than 6 miles and took me almost exactly 4 hours to complete. That includes time for photographs. However, I was moving pretty quickly because I had a few other places to visit in the afternoon. Most people would probably take more time with the hike.
I’ll go over the details of the route I took, but I highly recommend that you research on your own before making this journey. If you are only heading up to the waterfalls it shouldn’t be too hard to find your way, but hiking out to Oxbow Bend puts you about 3 miles into the Game Lands in a remote area, and you’re not going to want to get lost.
Unfortunately, since the trail is not maintained by a state park there are no official maps. I printed the unofficial map and step-by-step directions from this website. It may be unofficial, but I found it to be more than accurate enough for my needs. Honestly, I’m not sure I would have made it to Oxbow Bend without that map. I probably would have been afraid I was lost and turned back. I took the same hike described on that page, but I didn’t do that last part to the old tunnel.
→ Related reading: 10 Tips to Fabulous Waterfall Photography
Starting on the Trail
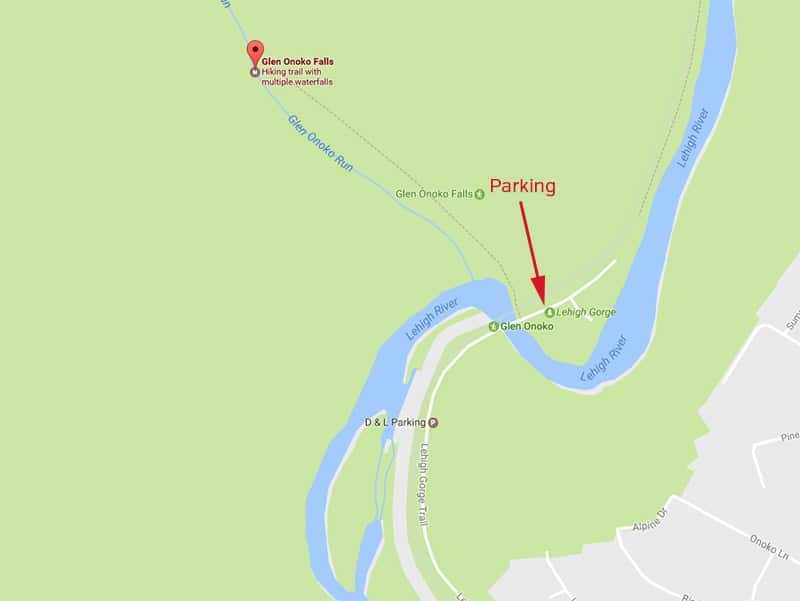
The parking lot for the trail is at these GPS coordinates: 40.883608, -75.760121
That parking lot puts you right at the trailhead. But this is a popular trail and that lot sometimes fills up. If that is the case you can head down the road a short distance and there are some other lots. From the ideal parking lot there are some stairs by the bridge that will take you down to the trail. Go down the stairs and then go under the bridge, heading north. Very soon you’ll be close to the intersection of Glen Onoko Run and the Lehigh River, and this is where you want to go. Stay to the left along the water. There is another trail that ventures off to the right. You don’t want to take this trail, at least, not yet. This is the return trail that leads back after you have seen all 3 waterfalls. It’s mostly stone steps all the way up and down. It’s a bit easier walking down that way as compared to returning on the main trail, but I’d imagine it is very tiring to walk up all those stairs. And even worse, you’ll miss all the best scenery.
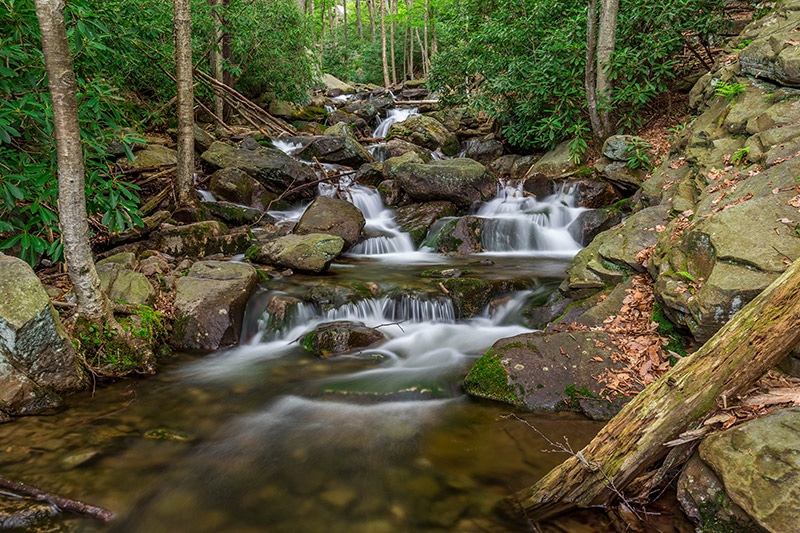
Stay to the left and you will reach the water in a matter of minutes. If you haven’t reached the water in a few minutes, you went the wrong way. As soon as you reach Glen Onoko Run you are greeted with amazing scenery. In all the reading I did preparing for this trail I read over and over again about the waterfalls and the overlooks from the top of the gorge. But I read very little about the cascades and the beauty along the trail. This part of it far exceeded my expectations.
All photos in this post were processed with the Landscape Legend Lightroom Presets. Learn more about how Landscape Legend can help you to save time and process your photos more effectively.
My first sight of the Glen Onoko Run
I hiked the trail in spring (late May), so everything was green and full of life. The plants were thick, and in many places it had more of a jungle-type feel than any place I had been in Pennsylvania. I’ve seen photos from fall and winter and without the plant-life I think it has a much different look and feel. I really enjoyed the atmosphere, and the water was flowing, as you would expect in the spring.
→ Related reading: Photographer’s Guide to Ricketts Glen State Park
Continuing on the Trail
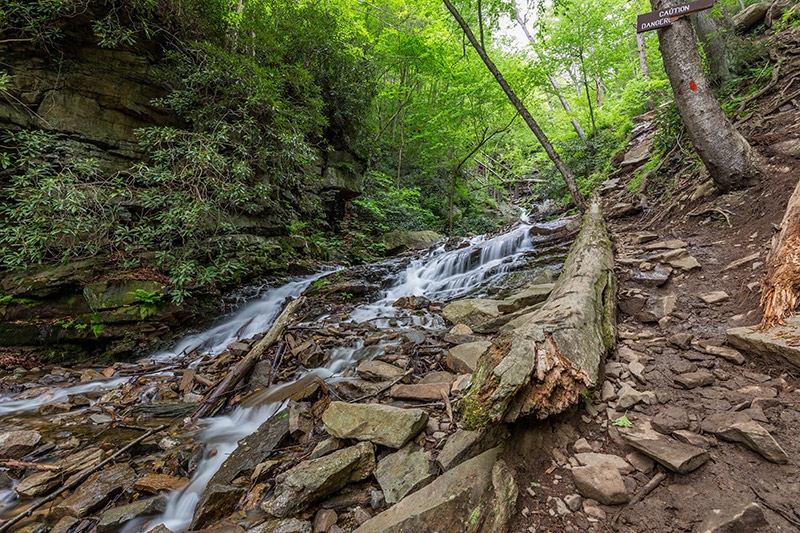
As you hike up the trail, Glen Onoko Run will be on your left. There is some graffiti in places indicating that you should cross the water. I don’t recommend that. There are some places where you would be able to cross, but the trail continues all the way up on the right side of the water. If you do cross, you may find it difficult to get back as you go higher up.
The trails ascends quickly, and the water tumbles down the whole way. There are many places where you can easily photograph. Some other places are not as easy. The trail isn’t obvious everywhere. Sometimes you’ll have to pick a path over some rocks and make your way up. At times, thick vegetation will be between you and the water. And in some places the rocks near the edge of the water are slippery and dangerous. Pick you spots carefully and photograph from the areas that seem safe.
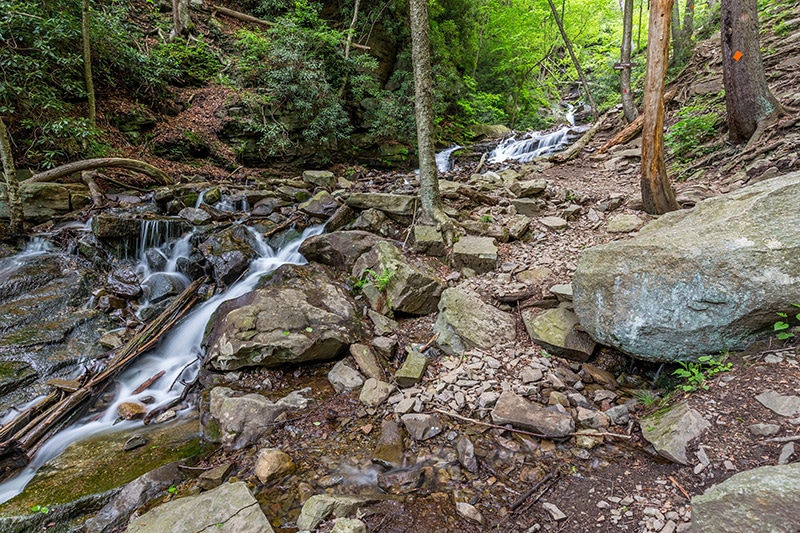
In some places there are a lot of downed trees and debris that block the path, both on the trail and in the water.
The photo below shows a section of the trail right next to the water.
Reaching the Falls
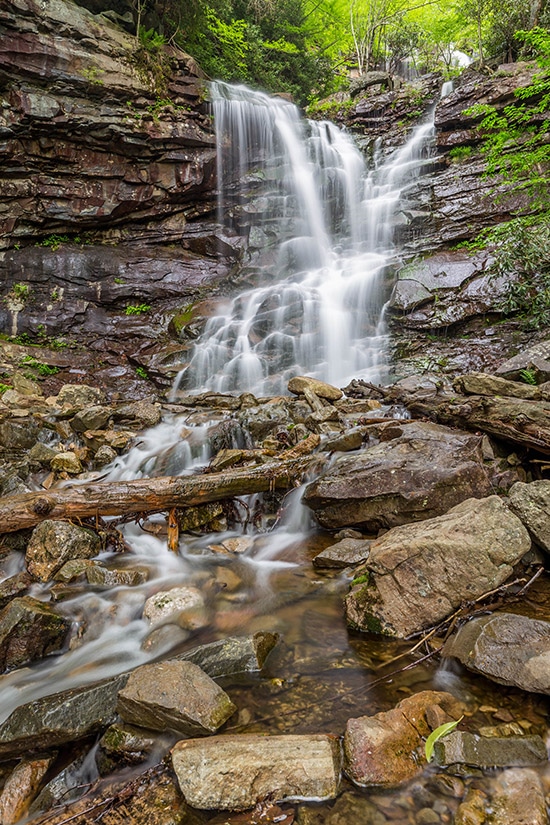
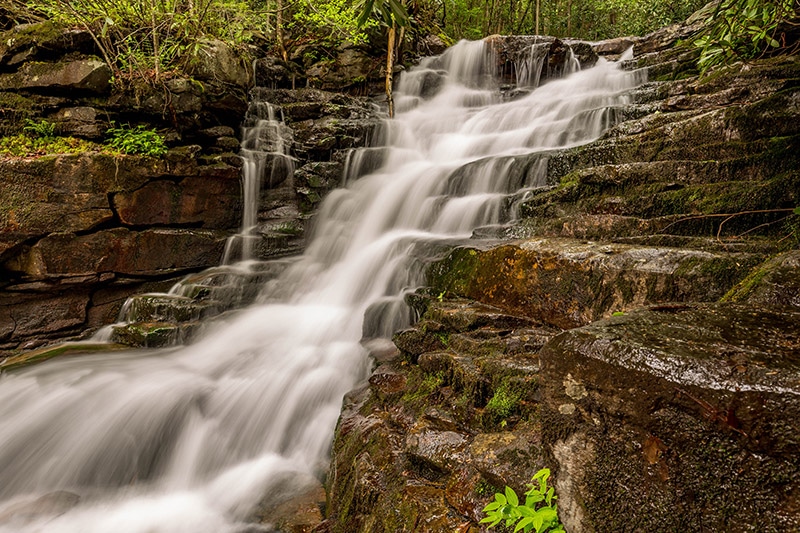
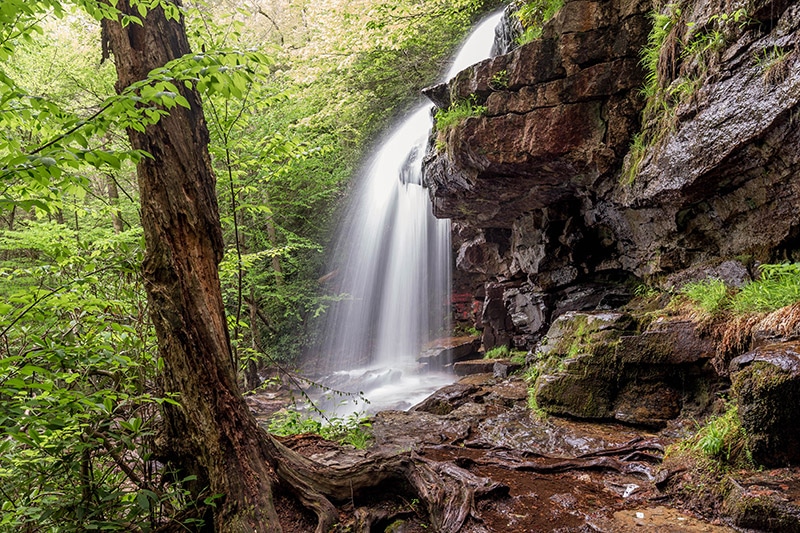
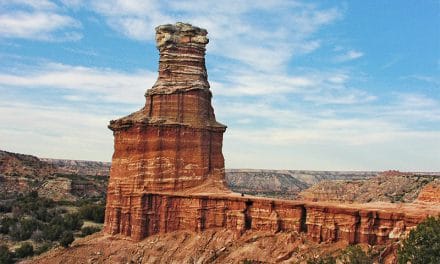
Before too long you will come to the first named waterfall. This is Chameleon Falls. It is maybe somewhere around 25 – 30 feet tall, and it is my favorite of the 3 falls on this trail.
Chameleon Falls
To get the this perspective I carefully ventured out a little bit onto some rocks and placed my tripod in the water. At other times of the year when the water level is low I imagine you can pretty easily find some dry places to set up.
The photo below was taken just downstream from a dryer area.
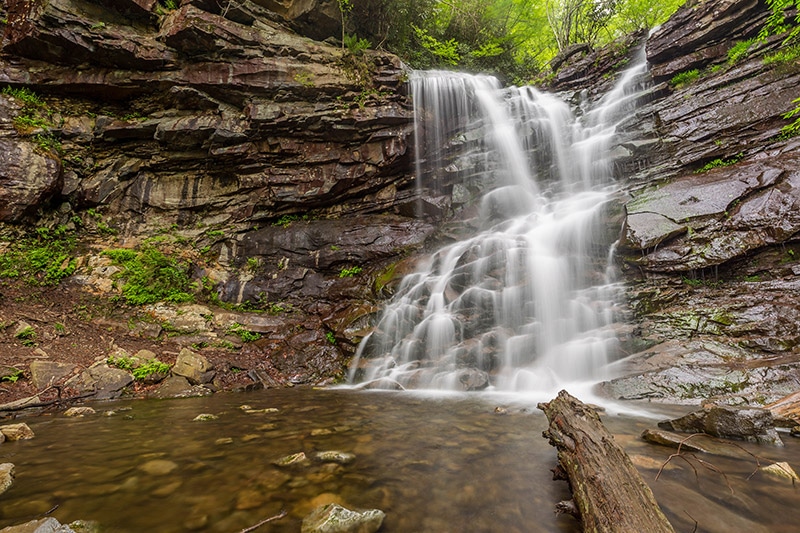
Shortly after Chameleon Falls you will come to Glen Onoko Falls, or sometimes just called Onoko Falls. It is the highest fall on the trail at about 50 feet. It is a fairly wide single-drop, and the water kind of trickles over the falls. There are a lot of rocks and very small cascades at the bottom, so you can work your way around and find the angles that you like. This waterfall looks best in spring or after a rain. The trickle gets pretty small at dyer times of the year.
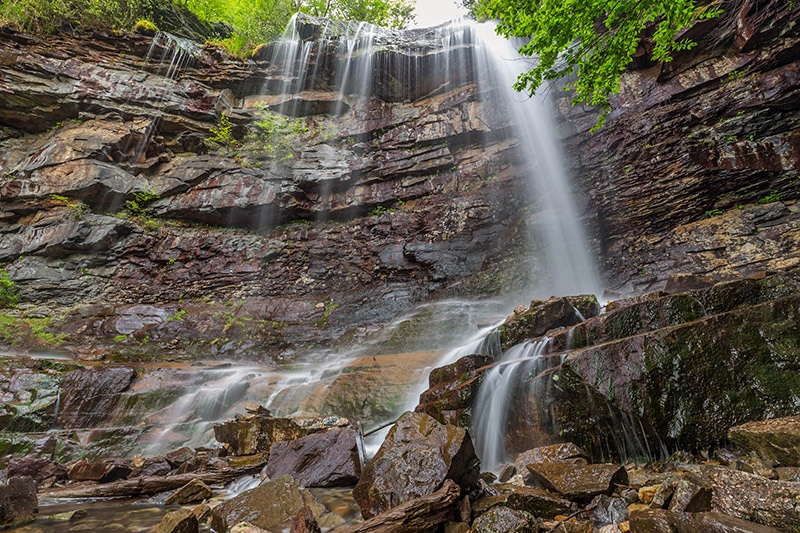
Glen Onoko Falls
Above Glen Onoko Falls you can catch a view out over the valley. There are ropes and signs here telling you to stay back. This is one of the more dangerous sections of the trail, but as long as you abide by the rules and stay behind the rope you will be fine. The rope keeps you from getting too close to the edge of the waterfall, where you could slip on the wet rocks and take a rough 50-foot fall to the rocks below. I’m not sure when the ropes were set up, but some of the deaths occurred here. So the ropes either prevent you from getting to the danger, or people ignored the ropes and tragically fell.
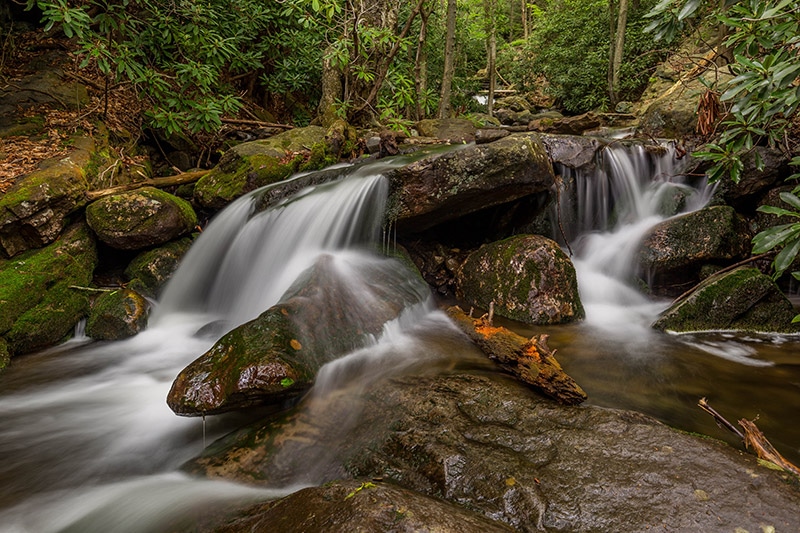
Shortly after Glen Onoko Falls you’ll come to a pretty impressive series of cascades.
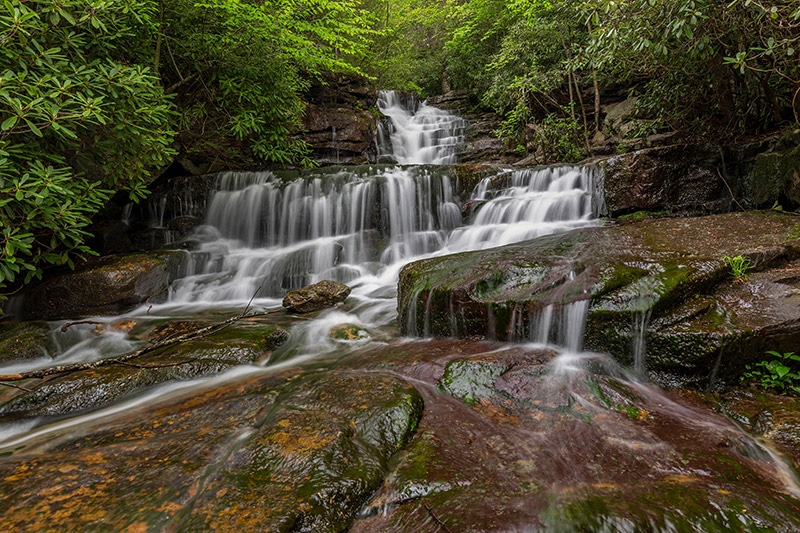
I’m a little surprised this section doesn’t have a name.
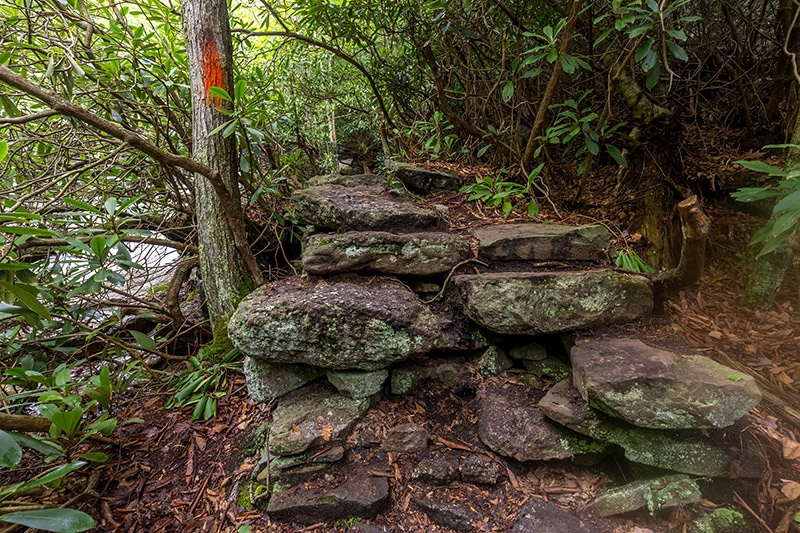
The trail continues on to the third, and final, named waterfall. The photo below shows what the trail is like in this area. You have to walk up the rocks and duck under some plants.
Soon you will reach Cave Falls, also called Hidden Sweet Falls in some places. You can walk behind the falls here if you’d like. I didn’t attempt it because I didn’t want to get myself or my camera wet with almost 5 miles of hike remaining. Unfortunately, there is orange spray paint on the rocks by the falls.
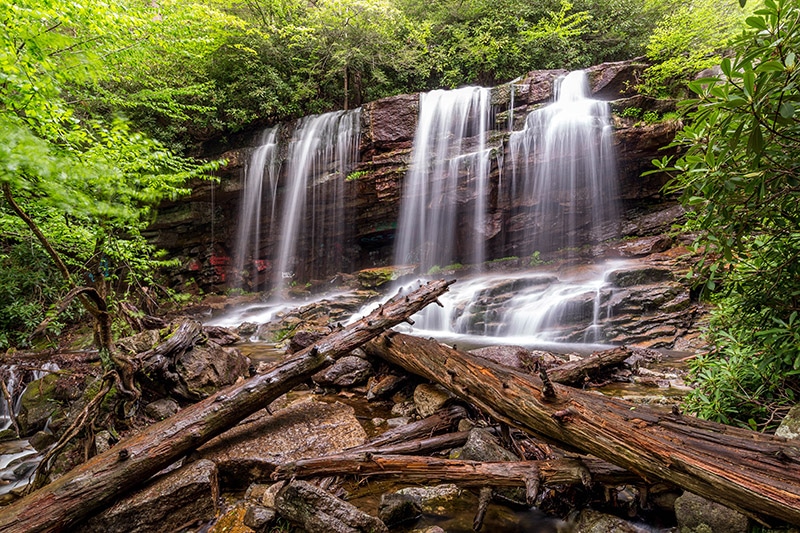
Cave Falls
And a side view of Cave Falls…
After passing Cave Falls you’ll come to a fire pit. This is an important point on the trail because you’ll need to know where you want to go. You can either head back down the trail the same way you came up, or you can take a different route. If you head to the right you will soon come to a vista that overlooks the town of Jim Thorpe. Here there is another trail that leads downhill. This is the return path with all the stone stairs that I mentioned earlier.
If you want to continue on to Oxbow Bend and another vista or two you will need to keep going. The orange blazes stop around Cave Falls or the fire pit (as of May, 2017). The trails from here out to Oxbow bend aren’t marked well at all, so it’s important to know where you are going. Use the map and step-by-step directions found here. It’s a more accurate description than I can give. Fortunately, you’re now at the top and the hike out to Oxbow Bend is relatively level.
After a while you’ll meet up with a grass/stone trail that leads a good distance. The photo below was taken at the star on the map that is about half way to Oxbow Bend.
The picture below shows what the path is like for much of the way towards Oxbox Bend.
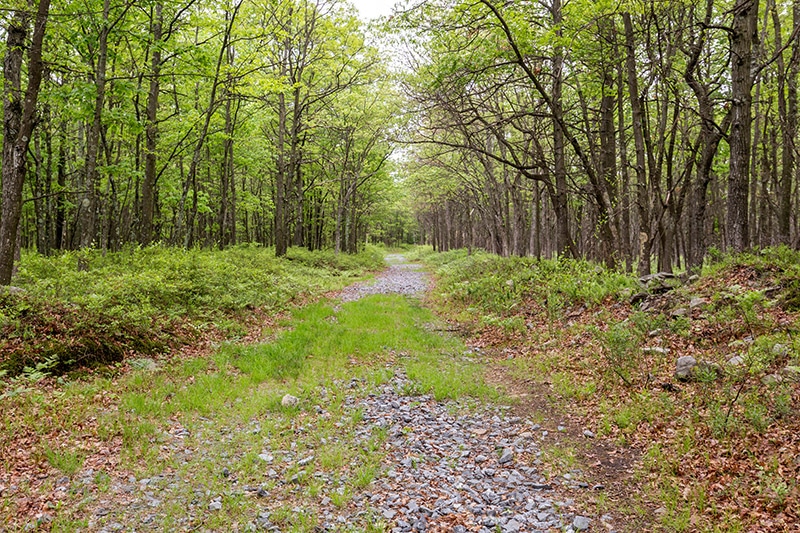
Headed towards Oxbow Bend
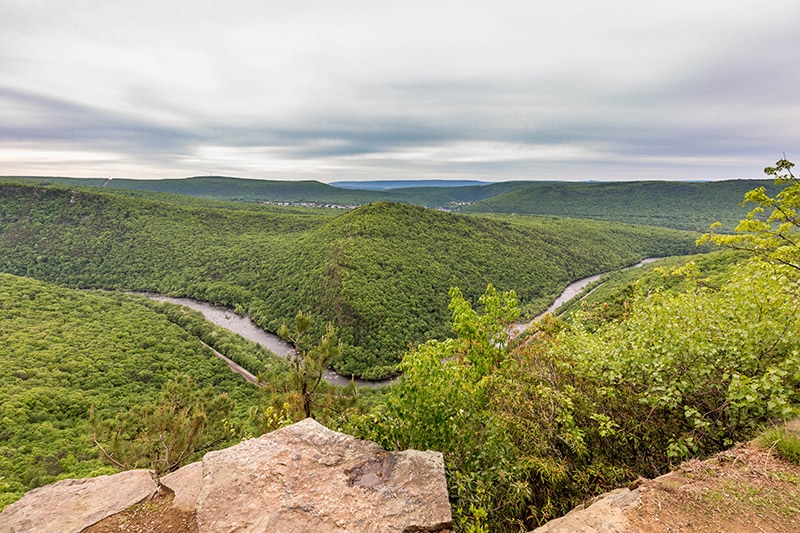
And eventually you’ll reach a small side trail that leads a short distance to Oxbox Bend, where the Lehigh River makes a sharp turn. The map is really helpful here because nothing is marked.
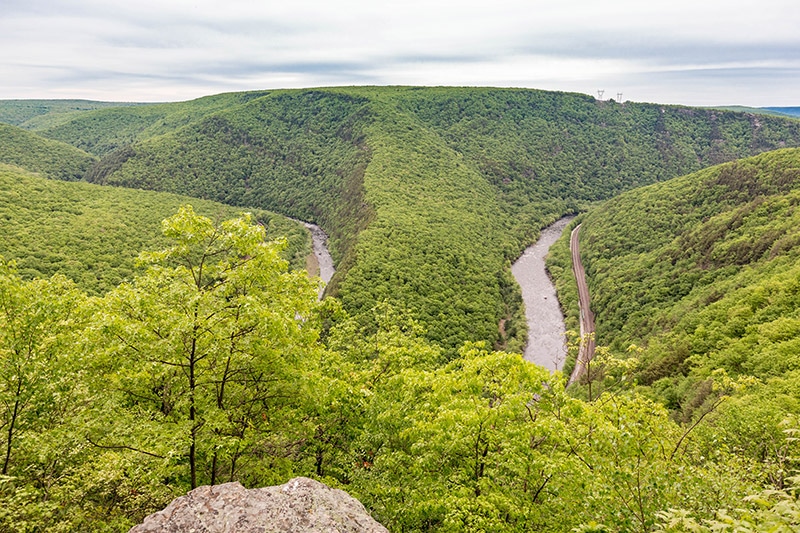
Oxbow Bend
At this point I turned around and hiked back. When I got close to the falls I took the return trail down the stone steps and made my way back to the parking lot.
Recommendations
Be Safe – There have been several deaths and many injuries on this trail. I don’t think the trail is dangerous if you are careful, but you must be aware. Personally, I wouldn’t take young kids here. Also, be sure that you know where you are going. The lack of markings on many parts of the trail is what concerns me more than the risk of falling. Wear hiking boots or hiking shoes with good grip. I’d also recommend long pants and long sleeves unless you are in unbearably hot temperatures. There are a lot of places where you’ll plants will be rubbing up against you, so having some protection from your clothing is a good thing. Also be sure to take water with you.
Continue on Beyond the Falls? Whether you take the trail only to see the falls or continue on further is up to you. I really wanted to see Oxbow Bend, which added almost 4 miles on to the hike. There are even longer options if you want. Next time I go back I highly doubt I will hike all the way to Oxbow Bend, unless I’m with someone who wants to see it. While it’s a nice view, the trees in the foreground really drop the value of the view, in my opinion. The fact that you are adding 4 miles onto an already challenging hike only makes it worse. My recommendation would be to head up to Cave Falls, find the fire pit and take the return trail down the stone steps. If you really want to reach the overlooks, go for it. But I found the first mile of the hike to have 95% of the beauty, and the other 4-5 miles only to have about 5%.
Arrive Early – Despite the fact that this is not a very well maintained trail, it is very popular. Maybe it’s the reputation of danger that draws people. But more likely, it is the beauty of the landscape. I hiked the trail on a Tuesday morning while schools were in session. I arrived at 6:30 am with only one other car in the parking lot. I hiked for 4 hours and nearly 6 miles without seeing another person until I was within 100 yards of getting back to the parking lot. By the time I arrived back to my car at 10:30 am the parking lot was half full and several groups of 2-4 people were starting out on the trail. I imagine during the summer or on weekends it is much busier. Avoid peak times if you want to take your time and photograph the falls and cascades without people in your way.
Choose an Overcast Day – The ideal weather for photographing the cascades and waterfalls will be a cloudy, overcast day. The area is under pretty heavy tree cover, so some sun won’t ruin your photos. But if possible, go on a cloudy day.
Wide Angle Lens – Every photo shown on this page was taken with a wide angle lens (Canon 16-35 f/4). I carried my 24-105mm f/4, but only used it a couple of times, and none of the photos shown here. Especially for the cascades and waterfalls, you will want a wide angle lens. At the waterfalls you will be photographing pretty close to the falls, so a wide angle is needed to get everything in the frame. See our Reviews of the Best Wide Angle Lenses for Canon DSLRs and Reviews of the Best Wide Angle Lenses for Nikon DSLRs.
Tripod – I know it is tempting to leave the tripod in the car on a long, steep hike. But if you’re going to the effort to make the hike in the first place, why not make sure you do it right and get the best photos possible? The tripod really is needed for effectively photographing the falls and cascades. Lighter tripods are best, as long as they are sturdy. I use and recommend a Sirui carbon fiber tripod, which is affordably priced.
Polarizer – The polarizer helps by reducing the glare coming off the water and wet rocks. There are plenty of wet rocks here, so be sure to have a polarizer with you.
Lens Wipes – Your lens may get some spray from the waterfalls. I got closer to Glen Onoko Falls than Chameleon Falls or Cave Falls, and spray was a bit of an issue there. Have some good wipes with you to clean your lens when needed. I use and recommend these lens wipes from Zeiss.
All photos shown on this page were taken with:
- Canon 6D
- Canon 16-35mm f/4 lens
- Tiffen circular polarizer
- Sirui T-024x carbon fiber tripod (overlooks where taken hand held)
Also in the Area
While you are in the area, there are other good locations to photograph as well. I went hiked this trail in the morning, then went to Lehigh Gorge State Park to photograph a few waterfalls (Buttermilk Falls and Luke’s Falls), then to Hawk Falls, and finally to Nay Aug Falls. See our guides for other locations in the area:
- Boulder Field at Hickory Run State Park
- Bushkill Falls
- Waterfalls of the Delaware Water Gap
- Ricketts Glen State Park


HI Marc, This article about Onoko Falls was a HUGE help to me. We were in Jim Thorpe yesterday and were thinking of trying to find
the falls until I started reading about them. I am 83 and have bilateral knee replacements. My husband was along, and he has
one knee replaced and the other needs it. We would surely would not have made it to the top. But what a temptation after seeing your photographs. I am a horticultural photographer and had just purchased some ND filters, hoping to find a suitable subject along the Lehigh. Didn’t happen :(( Do you have any suggestions for other falls that are more easily accessible that are within a two hour drive from Philadelphia. If you do, I would love to learn about them. Thanks so much for posting this.
Hi Diane,
Thanks for your comment. Dingmans Falls and Silverthread Falls in the Delaware Water Gap National Recreation Area are a little more than 2 hours from Philadelphia, but easily accessible. There is a trail to Dingmans Falls (maybe 1/2 mile) but it’s level and it’s a boardwalk most of the way. Silverthread Falls is right at the beginning of that trail. However, I think that trail is closed right now because of storm damage. The National Park Service website has information on trail closures. There are a lot of other falls in that area, but many of them are on trails that wouldn’t be friendly to bad knees. If you can stairs are better you could go to Bushkill Falls.