Photo by: Austin Neill
Long-exposure photography can reward you with some beautiful, dreamy images.
We’ve all seen them before –the silky, smooth rushing rivers, the beautiful soft, streaky clouds, floating across a sky of blue. Or even the smooth, streams of light trails created by traffic.
Perhaps you’re of the opinion that long-exposure photography is something that requires a great deal of skill and tremendous insider knowledge on every aspect of your camera –and as such it’s something that’s out of reach for you.
Let me assure you, that this isn’t the case! Sure, capturing masterful long-exposure images does require a certain level of skill, and practice does result in better photos, but you don’t any especially advanced skillset to get started with this genre –and with a bit of time and few tricks, you’ll soon be adept at creating your own breathtaking long-exposure images.
In this guide, we’ll discuss practical ways that you can incorporate long-exposures into your photography, as well as tips for success.
Read on to get started!
What is long exposure?
First up, let’s take a look at what this technique actually involves. The name refers to the fact that you leave the shutter open for a longer period of time than normal, but other than that, the rules are open. There’s no distinct time at which a photograph stops being a ‘normal’ exposure and becomes a long exposure – it’s more about the image that you capture than about the specific settings that you use.
Generally, long exposure is used for movement. When you leave the shutter open for longer, items that are moving can become blurred, and light sources will leave streaks across the image when they move. If you leave it open for long enough, then things that move very quickly won’t even be recorded.
Some examples of long exposure photography that you have probably seen before including car headlights leaving red or white lines above a road; stars leaving white lines across the sky; waterfalls, rivers, or streams with a silky, glassy look as the water rushes by; and people leaving ghost-like impressions as they move across the frame.
These are some of the common tropes of long exposure photography, and the interesting thing is that all of these can be achieved within the landscaping niche.
The other way in which long exposure can be used is to properly record an image in a very dark environment. If you were photographing at night-time, for example, you might want to leave the shutter open a little longer in order to capture more light. However, while the same technique may be used, we usually understand the term long exposure photography to refer to the capture of blurred motion, rather than a way to add light to a dark image.
Understand the Exposure Triangle
First things first, it’s important to have a good understanding of the exposure triangle.
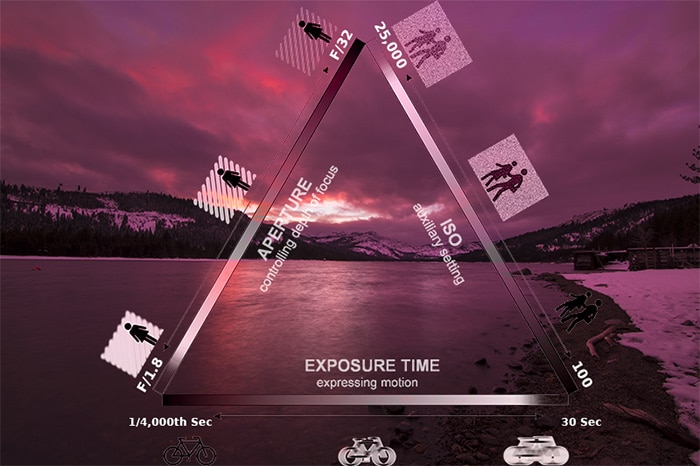
Image credit: Jeremy Jenson
The simple truth is that there is only one mathematically correct exposure that is correct for each photograph. However, the technique that you use to obtain that exposure can vary; which means there are many paths that lead to the correct exposure. Your camera’s aperture, shutter speed, and ISO are the three settings that you can use to adjust the exposure, and together, form what’s known as the “exposure triangle.”
The triangle is essentially the result of how three settings combine to create an exposure: it controls how much light enters (Aperture), how long it can enter (Shutter Speed), and how sensitive the camera is to the light (ISO). All three aspects are measured in stops of light, or fractions of stops, but we’ll go further into that another time. Whenever you adjust one it will change your exposure, and so knowing how each affects the look of your photograph is very important in choosing how you make adjustments.
It’s at this intersection, where these three elements cross paths, that the perfect exposure is found.
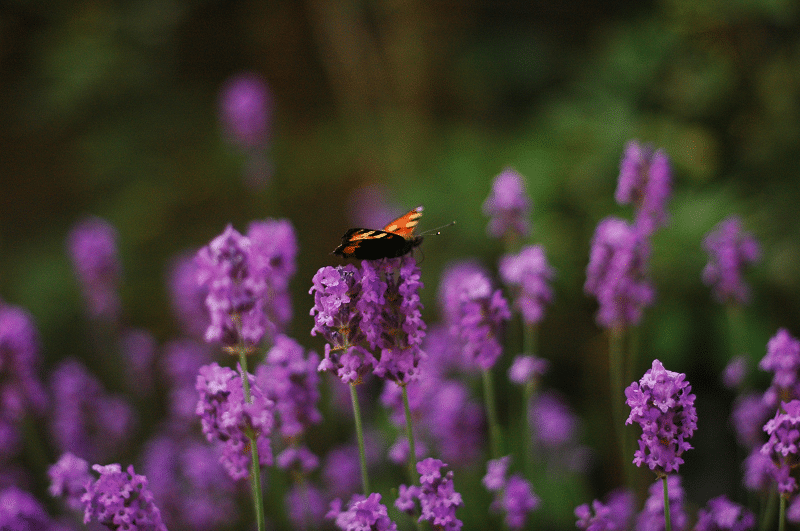
Photo by: Jim Richter
Aperture
Your aperture controls the size of the opening in your lens that allows light to reach your camera’s sensor. Think of this as opening the blinds in a house. The wider the opening, the more light comes in.
Your aperture settings are determined using a series of f-stop values on your camera. The smaller the f-stop, the wider the opening will be –and the more light will be allowed in. So f/2.8 is a wider aperture than f/16.
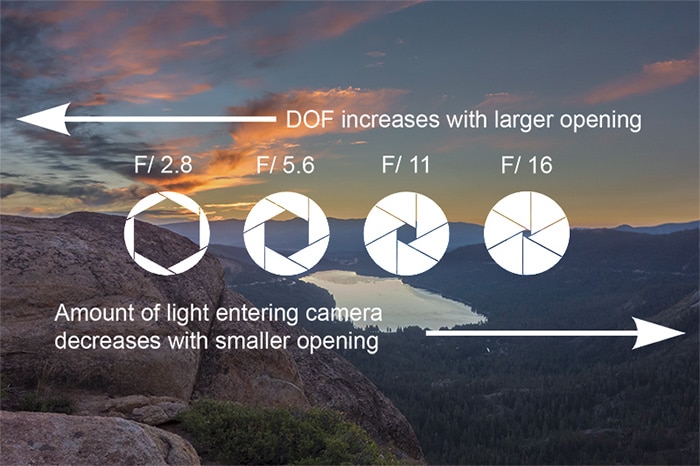
Photo credit: Jeremy Jensen
When shooting landscape photos, you typically want as much of the scene to be in focus as possible. To achieve this, it’s best to select a narrower aperture like F/8 -F/11. While many people believe the smaller the aperture, the greater the depth of field, it’s been proven that every lens has an optimal sharpness and if you close off your aperture all the way the photo may be less crisp than it would be at the optimal aperture.
For most lenses, this range exists between F/7.1 and F/16.
Your aperture doesn’t just control light, though; it also adjusts the depth of field in your composition. So for a narrower depth of field, where everything in your image is clear and in-focus, you’ll want to use a smaller aperture (a bigger number) –like f/11.
On the other hand, using a wider aperture (smaller number) –like f/2.8, will let more light in; resulting in a more narrow field of focus.
While a small aperture is useful for most landscape photography, where you want the entire image to be clear and in-focus, a wide aperture is ideal for those times when you’d like to isolate a section of your composition near the foreground, while blurring out the background. A wide aperture is also ideal for capturing beautiful bokeh.
Shutter Speed
Your shutter speed determines how long your shutter stays open for. The faster the shutter speed, the less light will get in, while a slower shutter speed allows more light in, resulting in a longer exposure.
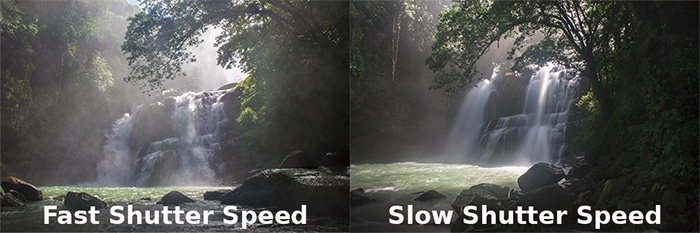
Photo credit: Jeremey Jensen
The shutter speed built plays two major roles:
It dictates how long light is recorded by your sensor, and
It determines the motion of your subject
Keeping the shutter open for longer, known as a long exposure, will add motion blur to moving objects depending on how fast they’re moving. Using a narrow aperture, low ISO, and/or a neutral density filter will help you to achieve this effect.
While a fast shutter speed is ideal for “freezing” motion and movement, a longer shutter speed is often used for artistic long-exposure images. The slow shutter speed renders movement as a blur, and can be used to capture softly blurred clouds or a waterfall. It’s also ideal for nighttime or low-light photography. Just be sure to use a tripod to steady your camera when capturing longer exposures.
ISO
The ISO on your camera also helps to control how much light you’re working with. Increasing your ISO makes your sensor more sensitive to light; allowing you to work with less light. While this may sound like a cure-all to all of your low lighting woes, the issue is that a higher ISO can result in more ‘noise’ or grain in your images.
However, adjusting the ISO can be very helpful when shooting in certain situations; like if you’re doing night photography without a tripod.
In these cases, a higher ISO can allow you to capture an image that would be otherwise difficult to get without significant blur. In general, an image with a bit of grain is preferable to one with a significant blur.
Of course, this doesn’t matter as much if you have a camera body that’s able to handle high ISO. In this case, you’ll be able to capture dynamic shots of Milky Way –without much noise.

Photo credit: Jeremy Jensen
ISO is also useful for situations where you need to use a narrow aperture, requiring a longer shutter speed, but you also don’t have a tripod to stabilize the camera.
The Exposure Triangle: Putting It All Together
Now that you have all three sides of the triangle, let’s see how they all work together.
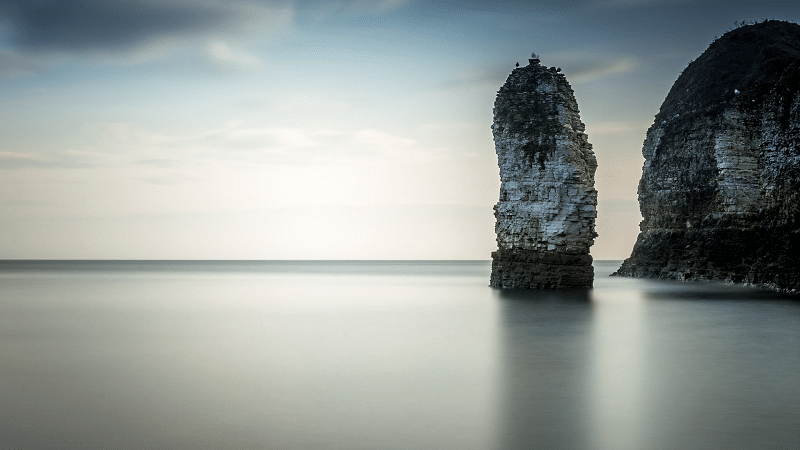
Photo by: Tim Hill
The exposure triangle is called a triangle for a reason. All three settings work together to help you get the right exposure. All three form what’s known as the exposure value (EV). This means that if you increase one of the three settings, you should decrease one –or both of the others to maintain proper exposure.
So for example, if you adjust your shutter speed, reducing it by four stops (1/25 – 1/50 – 1/100 – 1/200 – 1/400), the aperture also has to increase in size by approximately four stops as well (f/11 – f/8 – f/5.6 – f/2.8) for an equivalent exposure.
Keep in mind, though, that while the composition will stay the same, other aspects of your image –depth of field, focus, grain, will change. That’s the beauty of being able to use manual mode. You can adjust your camera so that it creates the results that you’re looking for while compensating for the exposure yourself.
Mastering the art of exposure is a process that takes practice. Many photographers have described the process as a juggling act, learning to balance the settings that are constantly in flux.
Have the Right Gear
Shooting long exposures will require a few specific items, and if you don’t have them your results will not be as good as they could be. Here are the things you will need.
1. A Camera That Allows You to Shoot in Manual and Bulb Modes
You don’t need an expensive camera, but you do need to be able to shoot in manual mode so you can have precise control over the exposure.
For exposures longer than 30 seconds you will generally need to use bulb mode. In bulb mode, the shutter will remain open as long as the shutter button is held down (or more realistically, you can use a locking cable release so you don’t need to hold a button down the whole time).
2. A Sturdy Tripod
Any movement will be magnified with a long exposure, so if you want a sharp photo you will need a tripod to keep your camera steady. Be sure that your tripod is tightened and as stable as possible.
Related reading: 11 Steps to Tack-Sharp Landscape Photos
3. A Cable Shutter Release
With a cable shutter release, you can take photos without touching the camera, which will eliminate any vibration caused by pressing the shutter button. A cable release is also needed for shooting in bulb mode for very long exposures or use a camera that has a remote release control via an app.
4. A Stopwatch or Timer
If you will be taking photos in bulb mode you will need to time them to get the proper exposure. The clocks on most smartphones include a stopwatch, so this may be an easy solution. However, if you are shooting at night you want a different option as the screen from your phone can put off light that will impact your photos.
5. Neutral Density Filters
A neutral density filter is a dark piece of glass that reduces the amount of light reaching the camera’s sensor, allowing you to shoot with slower shutter speeds. If you’re taking long exposures during daylight hours you will most likely need a neutral density filter in order to avoid overexposing your photos.
It’s recommended that you capture RAW files when shooting long exposures. Your neutral density filter might add a magenta or blue color cast to your images, which means that you should be able to remove the cast easier with a RAW file.
Neutral density filters come in many different strengths and varieties. You can get a variable neutral density filter that will allow you to adjust how much light reaches the sensor, but my experience with variable ND filters is not very good. The solid filters tend to be better quality and produce better results.
Personally, I have been happy with the ND filters from B+W.
Some photographers like to use an app that will calculate the exposure time they should be using, taking the neutral density filter into account. Others prefer to just set the shutter going and see what happens – and adjust afterward if needed. If you have a lot of patience or you like to learn things until you can do them intuitively, this approach should work for you.
If you’re short on budget or have no time to pick up supplies, then you can also use this as a hack: literally place a pair of sunglasses in front of your lens. They will need to be big enough to cover the whole lens, completely clean, and stable on the surface in front of the camera so they won’t move during the exposure. The results may not be perfect, but they will certainly be interesting!
Tips for Capturing Great Long-Exposures
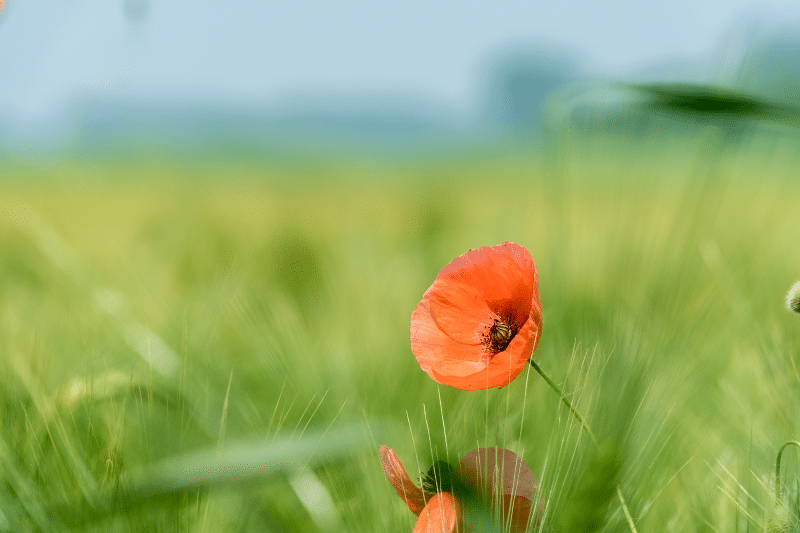
Photo by: Sven Gauditz
Consider the Weather
When it comes to shooting long-exposure images of the clouds, you will want to give special attention to the weather. Just before, or after a storm, for example –can be a great time to capture these images. The dark, brooding storm clouds –when captured with a long exposure, can result in some spectacular photos.
Even a clear day can be a great time to go, however, as long as there are at least a few clouds. High, fast-moving clouds make great subjects for long-exposure photography.
You’ll need 40% or more cloud cover to capture a silky sky with movement, and you will want to know the status of the tides of the height of the water if you’re setting out to capture that kind of motion. Wind plays a part, too: the windier it is, the fast the clouds or water will move.
How bright will the sun be, and when will it set? If you’re shooting at night, what phase of the moon should you expect? These are all questions that you need to answer ahead of time, as they will affect the way that you shoot.
On the other hand, while you’re still getting the hang of doing long exposure, it might be fun to just head out there and try a range of different conditions, to find out what happens with each.
If you are taking longer exposures during the day, you’ll notice that more and more light will enter the image. You can bring your ISO down to 100, and try to use your f-stop to counteract this, but at a certain point, you won’t be able to stop it from being overexposed.
If you’re planning to photograph a waterfall or the sea, the weather is less important, but you’ll still want to take some time to familiarize yourself with the location you are planning to shoot so you can become familiar with your surroundings and set up.
If you plan to leave your camera outside for a long period of time, particularly overnight, you might want to invest in a cover that will hide all but the lens and protect your camera from moisture and other potential materials. Insects, wild animals, dust and dirt stirred up by the wind, and rain are all potential hazards that could affect the working of your camera, so prepare for these ahead of time.
Finally, you might also want to add a dark cloth to your kit. Light can sometimes leak in from the camera body itself, in all the tiny hairline gaps that you wouldn’t normally notice. Placing the cloth over the top of the camera body will help minimize this effect.
Take a Test Shot First
Before you move to the long exposure, try photographing the scene with a normal exposure. You can now use your app to make calculations by taking a test shot and following instructions if you are taking this step. Taking a regular exposure allows you to see if the composition and the subject works.
You may find that it just doesn’t result in a great shot, and if that is the case your long exposure probably won’t be that great either. If so, go back to the drawing board and find another composition that works better. That can save you the time of getting your focus set, adding your filter, and waiting for the long exposure to be completed.
An exception to this would be night photography, where long exposures will almost always be necessary.
Don’t Overlook Your Composition
Shooting with a long exposure does not negate the importance of a strong composition. It’s easy to get distracted by the details of moving water, moving clouds, or whatever is going on in the scene, but don’t forget to be sure that you have a strong composition.
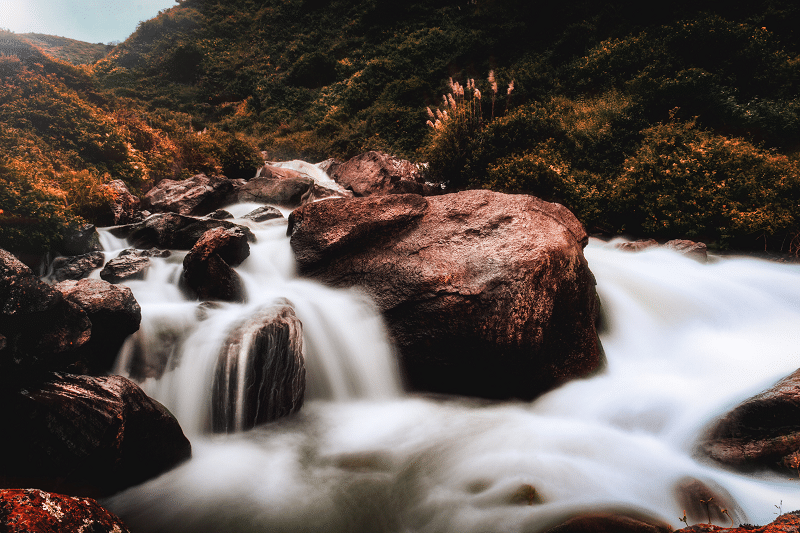
Photo by: Giancarlo Revolledo
– For seascapes, including rock formations or a piece of driftwood in the foreground can help to anchor your composition.
– For waterfalls, look to include some interesting foreground –like wildflowers or grass, or frame your image by including some overhanging tree limbs to help add context to your image.
– For clouds, in most cases, you’ll want to fight the temptation to just shoot the sky, and instead include some land to help add interest to your mage, and create a more balanced shot.
Get Your Camera Settings Right
• Use Manual Focus
Autofocus typically won’t work if you are using a dark filter or at night, which means you will typically need to use manual focus for long exposures. One option is to lock in the focus with autofocus and quickly flip the switch to manual focus, then attach the filter and the proper focus should be set.
• Shoot RAW
Long exposures can often result in added noise, which will need to be reduced in post-processing. Noise reduction is more effective with RAW files as opposed to JPG files. Shooting in RAW is advantageous in a lot of different ways, and this is just one of them.
Post-processing is necessary with all RAW files, but your long exposures may need a little more attention than other types of photos. The noise I just mentioned is one reason, but neutral density filters may also introduce a color cast or vignetting that needs to be corrected. If you are comfortable with Lightroom your long exposures will be much improved.
• Turn Off Vibration Reduction
To reduce some of the noise and shake problems that sometimes come up with long exposures, make sure to set your ISO to 100 and turn off image stabilization. If you’re using a sturdy tripod, you should be sure to turn on the vibration reduction or image stabilization feature off. If you’re camera’s stabilized, this will actually help to reduce vibrations and resulting image blur. Set your f-stop to somewhere between f/7.1 and f/11 in order to get a clear and crisp image across the frame.
• Activate the Mirror Lock-Up Function
For DSLR cameras, releasing the shutter results in the camera’s mirror moving –resulting in vibration. To avoid this, you’ll want to activate the mirror lock-up feature on your camera. This will turn your shutter release into a two-stage button.
Set up your focus, and then make sure to switch to manual focus so that nothing will change when you press the shutter. You’ll then have a window of time between the first time you press the shutter and the second time during which you’ll be able to take your image without vibration.
• Use a Slow Shutter Speed
For very long exposures, you’ll want to set your camera to “Bulb” mode. This will keep your shutter open as long as the trigger is pushed. The exact shutter speed setting will vary depending on a few factors including –available lighting, distance to your subject, the speed it’s moving, and your desired effect.
As a general rule, the farther away from your subject you are, the longer exposure that’s required. Faster-moving subjects that are closer will usually require faster shutter speeds. Keep in mind also, that the filters you choose to use will impact the shutter speed as well. The darker the setting, the longer you’ll need the shutter to be open for.
Here are a few examples of approximate shutter speeds that you’ll want to use:
• Streams and rivers generally require a shutter speed of around 1/15 through 1 second to create blurred effects.
• The ocean will require slow speeds, usually between 5 and 30 seconds.
• Traffic light trails generally require shutter speeds of between 10 to 20 seconds.
As always, the above speeds are a starting point only, you’ll want to take a test image, and adjust your settings accordingly.
Ideas for Long-Exposure Images
Now that you are ready to head out and start capturing long exposures, perhaps you are wondering where to start.
Here are a few ideas to help get the creative juices flowing as you head out to capture your very own long-exposure images:
• Moving clouds
• Rippling grass
• Waterfalls
• The sea
• Ripples on the surface of a pond or puddle
• Painting at night with flashlights
• Traffic light trails
• Sunsets or subsets
• Moving objects
• Fire
• Ferris wheels
• Tunnels with light
• Trains (From a safe distance)
• Fireworks
• Lightning
• Star trails
• Birds and other animals who live in large colonies, particularly during periods of migration or mass movement
The most effective way to use long exposure techniques is to couple the moving object with a background or foreground which is still. For example, you might capture stars or clouds moving above a mountain range, or a stream moving through a quiet countryside.
The contrast makes long exposure more effective. If the whole image contains motion blur, it might not capture the attention quite as well.
After your image is complete, it will usually benefit from some attention in Photoshop and/or Lightroom to get it looking a lot sharper and with better contrast levels, as well as more accurate tones.
While long exposures may seem challenging when you first start out, don’t let that stop you from getting started. Armed with a tripod, a good filter, and the knowledge to capture basic long-exposures you’ll be off to a great start –and soon capturing your own exciting, spectacular long-exposure images.
That’s all you need to know to get started with long exposures. The rest will come with practice and experience, as you learn how to make them work better for you!
Photo license links: CC BY 2.0, CC BY 3.0
Article credit: Marc Andre, Jeremy Jensen, and Christina Harman


Thank you for this very informative article. I have shot a little long exposure and the info you have provided is very helpful.
You’re welcome Jean! Thanks for your comment.
Think I noticed a slight mistake. In the paragraph on using MANUAL FOCUS, you write, “One option is to lock in the focus with autofocus and quickly flip the switch to manual focus, then attach the lens and the proper focus should be set.” Shouldn’t that be “attach the FILTER and the proper focus should be set” ??? Kinda hard to focus without the lens there, isn’t it? 🙂
Hi Jim,
Yes, you’re right. Thanks for pointing it out. I just made the correction.
HI Marc, thanks for the tutorial. Question: long exposure HDR with leaves moving – I have tried everything, but can’t keep the ghosting down. Is the answer to shoot one with a higher shutter speed and then try to blend? Nothing seems to work for me – appreciate your input
Thank you – but your illustration is misleading concerning f-stop and depth of field. it proclaims, ‘DOF increases with larger opening.’ The text in the article is correct, but the illustration and caption is wrong!
This is interesting! Industry know-how really helps the group grow as a whole!
I believe that what you stated in some of your aperture info is not correct. A smaller opening, like F 16, results in a WIDER depth of field, not like your stated “narrow”. Also the graphic above that is not correct. The larger the OPENING, smaller F number, does not increase depth of field. At least I don’t experience it. The depth of field scale on my lens also clearly shows that.