Disclosure: Loaded Landscapes is an affiliate of Skylum. If you purchase Aurora HDR through our link we’ll be paid a referral commission, at no additional cost to you.
Aurora HDR is an award-winning app from Skylum (it was named the best app of 2017 by Apple). Landscape photographers often face challenges related to dynamic range when dark shadows and a bright sky are present in the same scene. In many cases the best solution is to bracket exposures and then merge those multiple exposures together into one image that will capture the full dynamic range of the scene.
There are many options when it comes to HDR software. Photoshop and Lightroom both have the capability to merge multiple bracketed exposures into an HDR image, or you can use software or an app dedicated specifically to HDR processing. I started using Aurora HDR with the 2017 version, and right away I loved the program. When the 2018 version came out late last year I was excited to try it out. It’s taken me a while to get around to writing this review, but now I have several months of experience using the software.
Exclusive Offer: If you purchase Aurora HDR 2018 through our link you will get automatically our pack of 40 presets as a free bonus!
The big change with the 2018 version of Aurora HDR is that it is available for both Mac and PC. Previous versions were only available for Mac users, so this was a welcomed change for many photographers. Aurora can be used as a standalone app, or you can use it as a Lightroom or Photoshop plugin. I mostly use it as a Lightroom plugin since I have all of my photos organized in Lightroom’s Library Module.
You can use Aurora HDR with a single image, or with multiple bracketed images. From my experiences, the results have been much better with multiple bracketed exposures. You can also use it with raw files.
Right now Skylum is offering a great promotion on Aurora. Now through Sunday, February 26th you can get Aurora HDR 2018 plus several bonuses for just $89! Use the coupon “LOADEDLANDSCAPES” to get the $10 discount. And if you purchase it through our link you’ll get the discount, plus you’ll get our pack of 40 presets.
Using Aurora HDR 2018
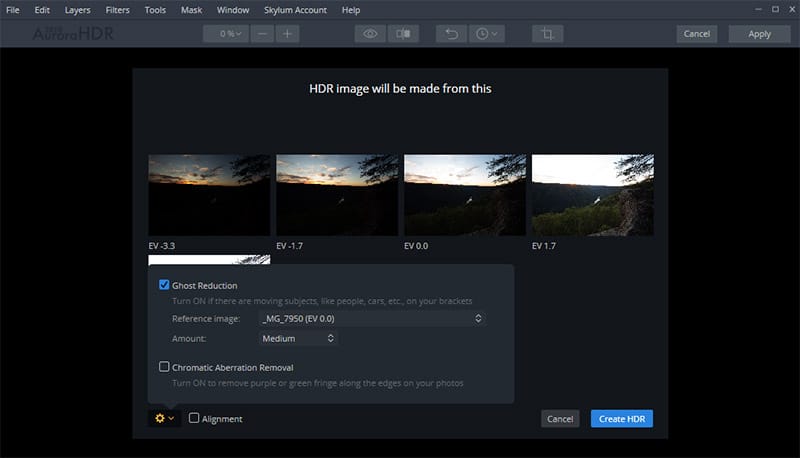
Getting started is very simple. When you’re working with multiple bracketed exposures you’ll see a screen like the one below that displays each of the photos that will be merged.
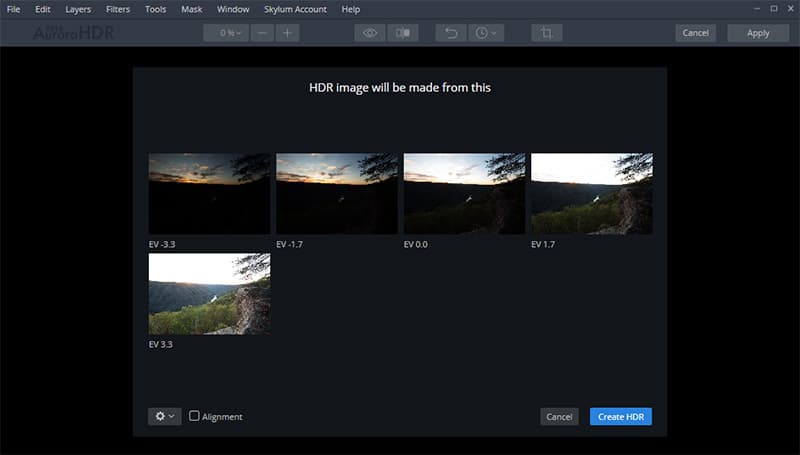
You can click on the gear icon to get access to some optional settings. From here you can set ghost reduction, which will attempt to fix any issues caused by moving objects in the scene. You can also set auto alignment, which will help if your camera was not mounted on a tripod or if there was some movement that caused the photos to not be lined up perfectly. Using these options will slow down the processing a little, so I would recommend not using them unless they are needed.
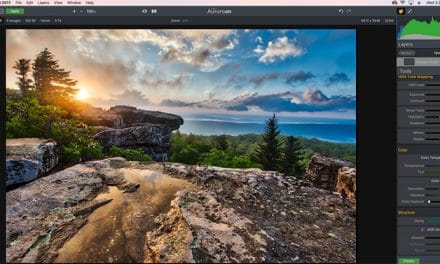
Once the image is processed you’ll see the interface shown in the screenshot below. You’ll notice the thumbnails of presets below the photo (you can hide those) and the sliders to the right.
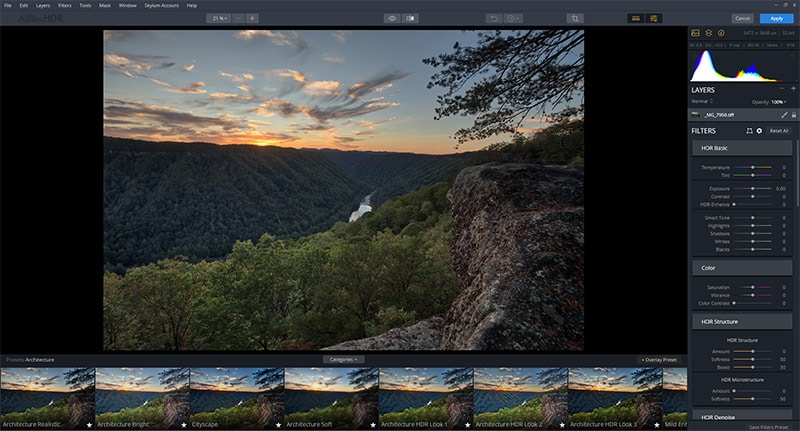
Below, you’ll get a closer look at the user interface in the right sidebar.

What I Like About Aurora HDR 2018:
Here is a quick look at some of my favorite things about Auroa HDR.
Better Results with the Default Settings (Compared to Lightroom)
I’ve tried using both Lightroom’s HDR Merge and Aurora HDR 2018 on the same bracketed exposures to compare the results. In most cases, but not all, I prefer the results with Aurora. In Lightroom I usually need to make many adjustments to a photo after the HDR merge. In Aurora I find that the basic merge looks better and closer to the end result that I want.
Non-Destructive
Like Lightroom, Aurora HDR features non-destructive photo editing. You can feel free to experiment and make any changes that you want, and it won’t impact your original file. You can also go back to the original if you don’t like the results of the changes made in Aurora.
Plenty of Options
Aurora HDR has tons of useful sliders and settings that give you all kinds of possibilities. Many of them are similar to options used in other programs, like Lightroom. Lightroom users will be immediately familiar with many of the sliders and options in Aurora HDR, but others are unique. Skylum offers plenty of video tutorials that teach everything you need to know to understand how the software works.
Excellent User Interface
The user interface of Aurora HDR is very well-designed and user-friendly. From my experience with Macphun/Skylum, their design is always top notch. This may not seem like a major issue, but a well-designed user interface is easier to use and saves you time.
Flexibility
Several years ago most HDR software typically produced unrealistic results that were immediately recognizable as HDR. In recent years there have been more options for creating natural, realistic-looking HDR images. For example, Lightroom’s HDR merge typically produces a more natural look. With Aurora HDR 2018 you can create whatever you want. A natural, understated look is possible (just don’t push the sliders too far), and if you’re interested in a more intense, extreme look, you can do that too. You can use presets to get a particular look, or adjust the sliders manually to get the photo to your liking.
Layers and Masks
Although Aurora HDR 2018 has plenty of sliders for editing your photos, what really takes it to the next level is the capability to use layers and masks. In a way it kind of combines what you can do in Lightroom and Photoshop. With some photos you may not need to use layers or masks, but when you want to make more detailed or specific adjustments, this is a powerful option to have. You can use a brush tool to make selective adjustments, or to erase. Luminosity masking is also possible.
For Professionals and Amateurs
Skylum has attempted to meet the needs of both hobbyists and professionals with Aurora HDR. The ease of use and simplicity make it a nice option for hobbyists, but it is powerful enough for professional photographers. The advanced tools like layers and masks give it the capabilities needed to be a suitable option for professionals.
Presets
Aurora HDR comes with some pre-installed presets. You can use these presets to get a specific effect or look for your photo. Of course, you can also use the presets as a starting point and customize the sliders and settings after the preset has been applied.
In addition to the presets that come pre-installed, you can also save your own presets. This is a great way to save time and re-use the effects that you like best or use the most often.
One of the nice features of the presets is that you can adjust the opacity. If you like the effect of a preset but it is too strong you can just move the slider to the left (shown below) to reduce the opacity, which reduces the strength of the effect.
If you purchase Aurora HDR 2018 through our link you’ll automatically get our pack of 40 presets as a free bonus!
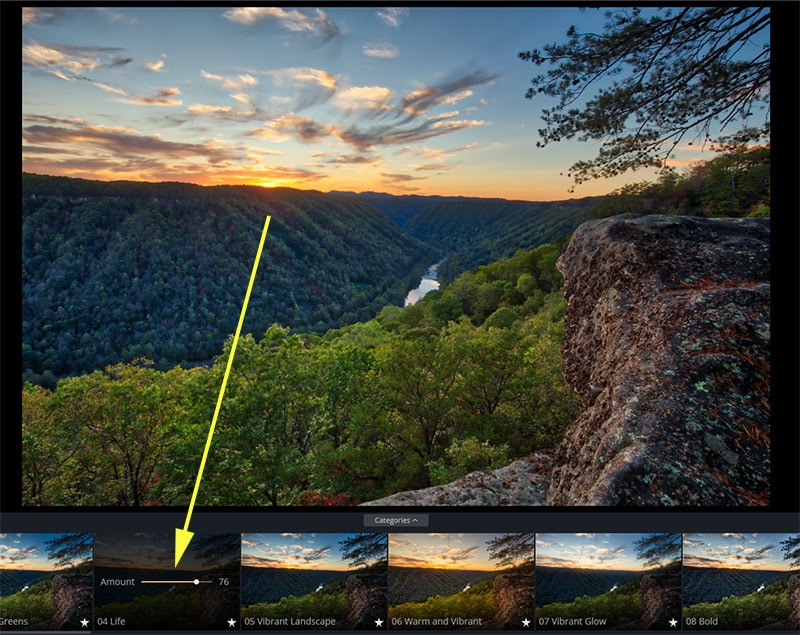
Visual Display of Presets
One nice feature is that you can get a small preview of the impact of a preset without even applying the preset. Below the photo you can see a thumbnail of how the photo will look if the preset is applied. If you see something you like you can click on the thumbnail and the preset will be applied to the photo, and you’ll be able to get a bigger, better view.
Constant Improvement
One of my favorite things about Skylum is that they are always working to improve their software. Aurora HDR has only been around for a few years, and it’s already come a long way. A great example of this is the 2018 version being available for both Mac and PC. They’ve added lots of new features, improved the user interface, improved the processing speed, and I fully expect that they will continue to improve Aurora HDR going forward.
What I Think Could Be Improved
Ok, so I’ve pointed out some of my favorite things about Aurora HDR. Now, let’s take a look at a few things that I would like to see improved in future versions.
Speed
The 2018 version saw a nice speed boost compared to previous versions, but there are still times when I would like to see it process faster. Merging multiple exposures to create HDR images is always more time consuming than processing individual photos, so setting proper expectations is important. The area I would like to see improvement is how quickly changes to settings are applied to the image that you are previewing. After you change a slider or setting you’ll often get an “image processing” message for a second or so before you can see the results of the adjustment that you made. Any improvements here would be a big time saver if you spend much time in the program.
Auto Lens Corrections
In the 2018 version they added lens correction sliders, which was a subtle but important addition. With these sliders you can correct distortion, vignetting, and chromatic aberration caused by the lens. While this is a great addition to the software, I really like Lightroom’s automatic lens profile corrections. Assuming Lightroom recognizes your lens you can just check the box and the corrections will be automatically applied so you don’t need to adjust any sliders. I would love to see the added to Aurora HDR.
Addition of Dehaze Slider
Another Lightroom feature that I miss in Aurora HDR is the dehaze slider. The dehaze slider is useful for cutting through haze, or for adding a little haze to your photos. In most cases I only make very slight adjustments with the dehaze slider in Lightroom, but it’s still quite powerful. I would love to see a dehaze slider added in Aurora HDR.
Conclusion
Overall, I really like Aurora HDR 2018. As I mentioned earlier, the 2017 version was my first experience with Aurora HDR. I immediately liked the software, and the 2018 version is an improvement over the previous version. I still do use Lightroom’s HDR merge at times, but in most cases when I want to merge multiple bracketed exposures I will turn to Aurora. For me, this is often with sunrise or sunset photos.
I definitely would recommend Aurora HDR 2018 to other photographers based on my own experience with the software.
If you want to give it a shot, Skylum offers a free trial. And if you want to buy the software be sure to get it through our link so you can get our pack of 40 presets as a free bonus. You’ll also get the best pricing available if you buy through our link.