Creativity, imagination, passion, eye for detail, and patience are some of the desirable qualities of an exemplary photographer. These are not just characteristics you develop overnight but through time and experience.
Nevertheless, underneath all these desirable qualities, a good photographer must understand the fundamental pillars of photography. These are the shutter speed, ISO, and of course, the aperture. In this post, we will focus on the third pillar – the aperture.
This photographer’s guide will answer the questions, “What is aperture” and “How does aperture affect the photos?” Sit down, take a pen and paper, and it is time to learn everything you need to know about aperture.
[table id=4 /]
What is Aperture?
The aperture is the opening of a hole inside a lens where the light passes through the camera. It is where the light enters the camera, which affects the brightness of the image captured.
This is not just applicable for cameras, but also in telescopes or microscopes. It’s just like your eyes when your eyes are wide open; the more light comes through. If you squint your eye, lesser light enters.
When it comes to the purpose aperture in cameras, the concept is simple: the larger the aperture, the more light comes in, the photo will be brighter. If the aperture is smaller, the less light comes in, and the photo captured will be darker.
The aperture affects the brightness, exposure, depth of field, and other effects. Let’s discuss this further.
What Does Aperture Do on Your Photos?
The aperture settings affect three main aspects, the shutter speed, exposure, and the depth of field. Changing these qualities will give you a range of effects like a shallow focus or blurry subject. It will also affect the performance of the photographer since it also affects the shutter speed. How important is the right choice of the aperture?
Shutter Speed
The shutter speed is the time measured in seconds on how long or how short the camera stays open. If the lens uses a wider aperture and depth of field, and more light is coming in, the shutter most likely doesn’t need to remain open.
This is if there is a correct exposure that will result in faster shutter speed. If a smaller aperture is used and lesser light comes in, the shutter needs to stay open for more extended periods, and the shutter will have a slower speed.
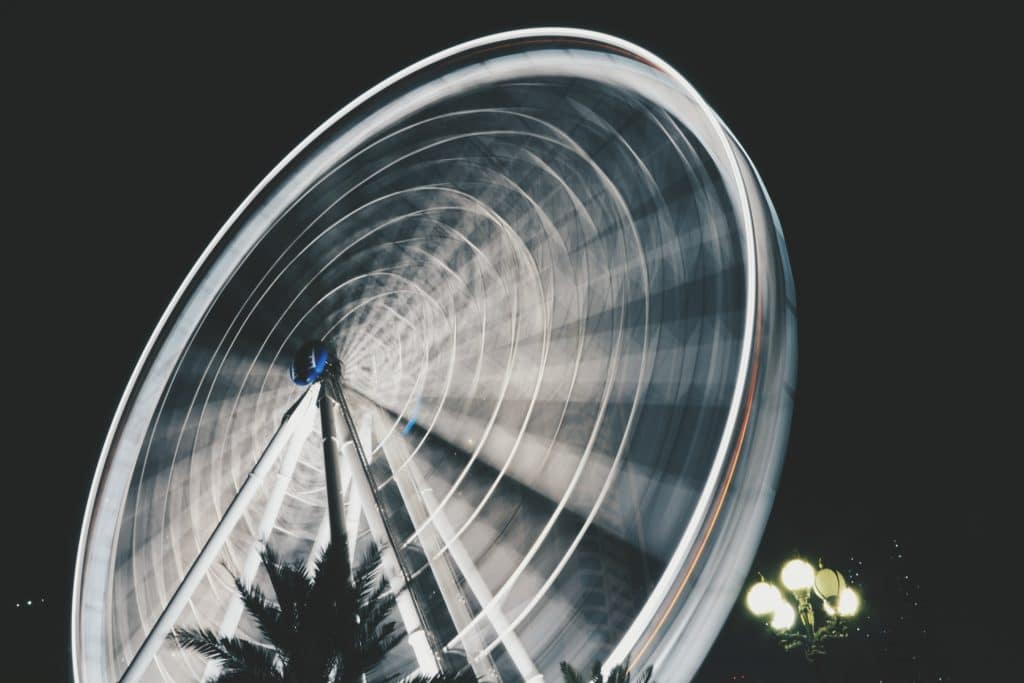
Photo of Shahzin Shajid on Unsplash
This is particularly important in motion photography, like sporting events where everything needs to be captured every second. In fast motion photography, it is crucial that there are no blur and freeze moments; that is why the aperture dramatically affects the photographer’s performance.
Exposure
The aperture affects the overall brightness or exposure of an image. Since the aperture is the “entry of light,” it will significantly affect the brightness or exposure, and this is the first detail notice on a photo.
Try a series of sample shots (without flash) using larger apertures, and the outcome is a brighter or more exposed image. Compare it to photos using a smaller aperture, and it is obviously going to be darker.
That is why it’s recommended to use larger apertures in dark environments like at night and dark indoors. Getting as much light as possible without using a flash is the key to take natural-looking photos in dark environments. For outdoor photography, especially in broad daylight, where the sun is your main source of light, it’s recommended to use smaller apertures.
However, the desired exposure not solely depends on the aperture alone. In some light conditions, the ISO also affects the light coming into the lens of the camera. The ISO determines a camera’s sensitivity to the light. That is why a brilliant photographer needs to balance everything in order to end up with a great shot.
Depth of field
Another aspect the aperture affects is the depth of field. The depth of field is the distance (or the depth) of the subject in which it will stay focused behind and in front of the major point of focus.
For instance, when you use a large aperture, it will result in a wider blur of the foreground and background. In other words, the focus area will be smaller; this is called a shallow depth of field or the shallow focus effect.
If you’re into portrait photography or want to take a photo and want to isolate the subject, a large aperture is the best choice. You can also frame the subject with objects in the foreground, which makes the front objects of the photo blurry, but the main subject in the background is sharper.
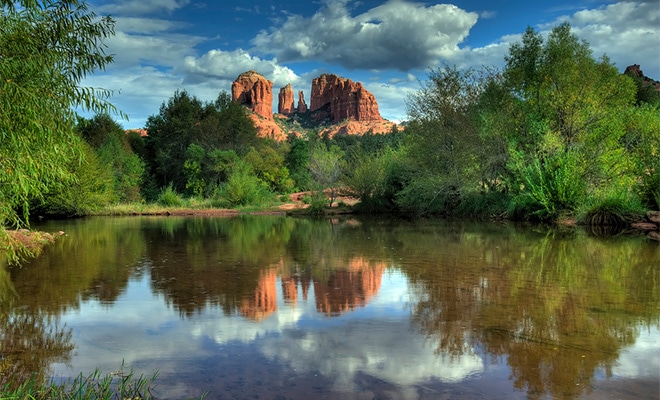
The opposite of the shallow focus or shallow depth of field is the deeper depth of field. Of course, smaller apertures must be used. These produce sharper images, with no blurry background or foreground. This is best for landscape, architectural, nature photography.
Yes, the aperture significantly affects the depth of field but also keeps in mind that distance of the subject and the focal length of the lens affects the outcome of the image.
Now that you know how the aperture affects the image or video, let’s get more technical. How do you identify aperture on your camera? What are the technical terms used? You may have heard of the F-stop, but not quite sure what it means or what it does. Let us dig deeper into what is F-stop and its relation to the aperture.
What is F-stop?
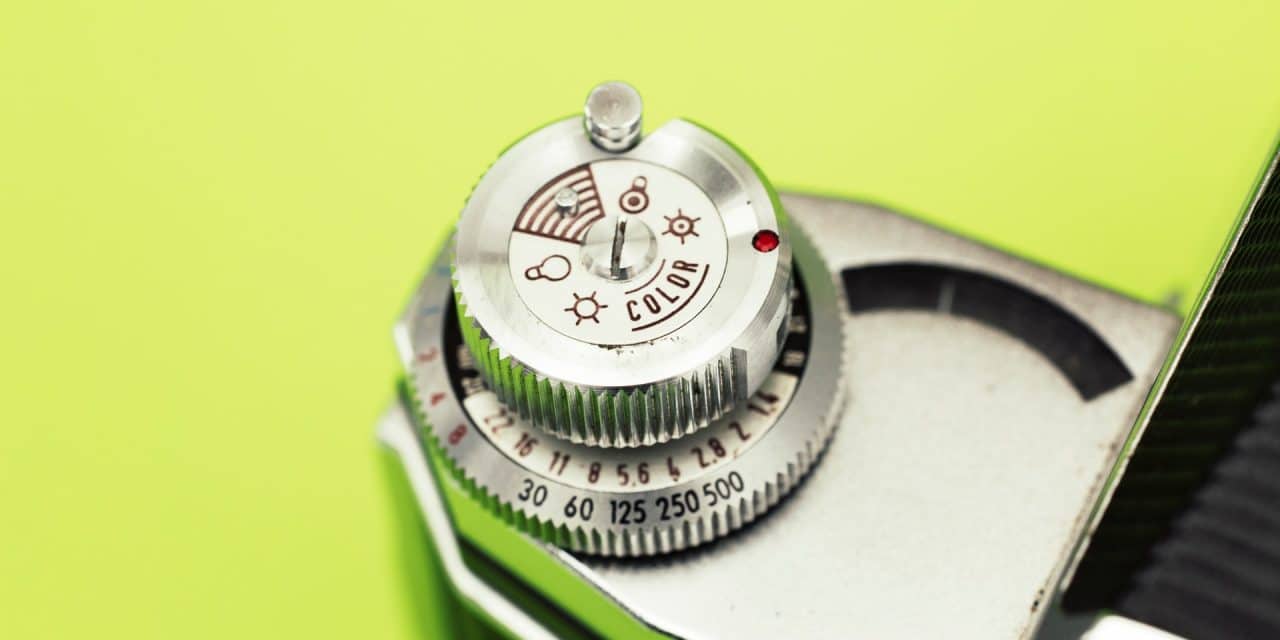
Maybe you have seen the terms “F-stop” or “F-number” on your camera before, but not certain what it is, let me explain further. Remember that these are the technical terms to describe the aperture.
The f-stop looks something like f/2, f/8, f/22 or f2, f8 or f22. Either way, they’re the same, it just depends on the brand of your camera. The f-stops determine how large or small the aperture you want to use in a photo.
The concept of understanding the f-stop is simple if the number on the f-stop is smaller (like f/2.8), the aperture used on the lens is wider, this more light comes in and has a shallow depth of field. If the f-stop number is bigger (like f/16), the aperture is smaller, and the lesser light comes in and a deeper depth of field.
Wide Aperture
A wide aperture or large aperture can quickly bring in light into the camera. An f-stop of f/2.8 is considered a large aperture. Depending on the lens’s distance to the subject of the photo, the succeeding f-stops after f/2.8 but less than f/8 can be considered a wide aperture.
What Is the Wide Aperture Mode?
The wide aperture mode has several effects on the photo, such as depth of field, emphasizes subject isolation, need for action photography, and more. Here’s why:
- Shallow Depth of Field: As mentioned earlier, if the wide aperture is used, you can focus the camera on the subject of the photo, while the background is blurry. Or the area in front (or the foreground) can be blurred, and the subject of the photo in the background can be the focus. Only the subject of the photo is sharp, and the rest can be out of focus as you wish.
- Subject Isolation: Since a large aperture sharpens the subject of the photo alone and blurs the rest of the aspect of a photo, a wide aperture is perfect for subject isolation.
- Bokeh: If the subject of the photo is sharp and the rest of the area is out of focus, that portion is called bokeh. An image using a small aperture has a sharp contrast on all aspects of the photo, so it doesn’t have the bokeh. The bokeh can even produce pleasant backgrounds when there are points of light. These are represented with light globes, or they say are “orbs.”

Photo of Thor Alvis on Unsplash
For example, in night photography and you’re taking a picture of a person in the middle of the street, and there are cars behind, the headlight from the cars produces these light globes effects. It’s like glitters or stars in the background, and it looks like it came out right from a fairy tale.
- Creative Bokeh: Aside from the light globes or orbs naturally produced by a bokeh, there is also creative bokeh, that photographers can come up with. Instead of a regular bokeh that is circular in shape, it can be creatively turned into a shape of heart, electric bolts, or stars.
All you need is to get a piece of paper, preferably cardboard, and cut into a circle the lens’s size. In the middle of the piece of paper, you can cut a heart shape or whichever shape you prefer. Place it above the lens, stroll at night, find the best subjects, and shoot away.
- Low Light Photography: A fast lens with a wide aperture is needed, especially in low light photography. Cameras these days perform better with high ISOs and are needing larger apertures. A camera with at least a 50mm lens and a large aperture is the best recommendation for low light photography settings.
- Action Photography: As mentioned earlier, when a wide aperture is used, the shutter speed does not need to close always, as compared to a small aperture. The fast shutter speeds allow the light to enter the camera quick enough that capturing of the photo within a fraction of a second is possible without creating crappy outcomes.
Action photography is best used for sporting events, or in a face-paced picture-taking like in a red carpet event like the Golden Globes. That is why wide aperture is recommended for fast-moving subjects, like frog jumping, a water drop, etc. What you want is to take a photo at a fast speed without blurry, dark, and moving focal points on the image.
- Portrait Photography: Wide apertures are used by portrait photographers to isolate the subject from the background and foreground. This is to make sure that in the eye of the viewer, the subject is the sole focus. The distraction elements appear to be blurry, which gives that “dreamy” look. For portrait photography, the dreamy look is the rightful outcome photographers want to aim for.
How Do I Make My Aperture Wider?
Adjust your camera with a wider aperture by looking for the Aperture Priority mode. Remember that settings on cameras differ on each brand; some have the A or AV mode dial. You may choose a wider aperture with a control wheel or the adjust button and watch the f-stop numbers on the screen.
With the Aperture Priority Mode, you just need to select your desired aperture, and the camera will automatically select the shutter speed. In the case of a manual mode, you need to select the aperture and shutter speed manually.
You will notice that as you adjust into a wider aperture, more light comes into the camera. It is always best to snap a trial shot to know which aperture is best for the pictorial setting.
When Would You Use a Wide Aperture?
A wide aperture has a lot of uses for different kinds of photography. To summarize the uses of the wide aperture, these are:
- Subject Isolation
- Portrait Photography (recommended use: f/1.8 and f/2 depending on the distance of the camera and subject)
- Sporting events
- Night Photography
- Close up photography
- Fast-paced events (e.g., Paparazzi shots, red carpet events, etc.)
Low Aperture
The low aperture or others would call a small aperture has the higher f-stop numeric equivalent (e.g., f/11, f/16, and f/22). Remember that a small aperture has lesser light coming in and the depth of field thin. Of course, it is the complete opposite of a wide aperture.
Low aperture has f-stop like f/8, f/11, or f/16 that enables the photographer to capture sharper details both in the background and the foreground. There are no blurry aspects of the photo, and everything is clear.
Slow Shutter Speed of Low Aperture
Since less light comes in the lens of low aperture, the shutter speed is expected to be slow. With this combination, it can produce a variety of effects on the photo.
For night photography, the whole content of the photo may not be clear, but it will produce several effects that a wider aperture could not produce. For example, in cityscapes, it will produce starburst effects from streetlights and lights from cars.
When taking a picture of a subject that’s in motion, it will take a sharp image of the subject, but the background may look like it’s moving; this is called the motion blur. The slow shutter speed can also flatten a body of water or make white water appear like it’s silk cloth.
What Is Low Aperture Good For?
When you’re into the landscape, architectural, and big groups photography, a lower aperture is best recommended.
- Landscape Photography: For landscape photography, if there is no subject that you need to focus on, you can use a lower aperture, so the whole photo is sharp. The depth of field is much larger, so you can cover the whole landscape without blurry aspects of the photo.The recommended starting f-stop for landscape photography starts at f/11. The high detail on the whole subject, of course, will differ due to many factors, so consider adjusting the f-stop if needed.
- Architectural Photography: Architectural photography involves photos of buildings, houses, ancient ruins, and more. The preferred aperture spectrum for is between f/8 to f/11 to set the background and foreground aspects must be all in focus.
- Aerial Photos: Since aerial photography needs a sharp photograph, a low aperture is recommended. Aerial photos can be done in two ways, flying a drone or taking a picture from a tall building. The suggested f-stop for aerial photography is starting at f/5.6, capturing the image with a full focus. If needed, make some adjustments up to f/8 or higher as many factors must be considered (e.g., the height of the drone, sunlight, etc.)
- Starburst Effect: Two of the most popular starburst effects are from night lights (e.g., street lights, the headlight of cars) and the sunlight. For street lights, a lower aperture is recommended, because the lower the aperture is, the thinner the spikes of the starburst effect will be.
When it comes to the starburst effect of the sunlight, it makes sense to use a smaller aperture, so lesser light comes in, as the sun is too bright already. Also, it is not recommended to take a photo of the whole sun. The image may be overexposed, it’s not good for your eyes (unless it’s sunset) and it won’t produce a starburst effect.
One technique for the sun’s starburst effect is to find ways to block portions of the sun. Let’s say, for example, cover half of the sun with a leaf, a building, or clouds. The smaller aperture will capture a sharp image and will produce a magnificent starburst effect. Start with f/16 and work your way up when you’re aiming to capture the beauty of the sun.
- Panning: With a smaller aperture, panning is also possible because it gives a large depth of field. Panning is used when you want to take an image of a moving object and make it appear that they are fast motion, similar to a motion blur.
- Group Photos: To make sure that everyone in a group picture is in focus, a smaller aperture is recommended, especially starting at f/8. This can be applicable for class pictures, a group of people, weddings, etc.
Minimum and Maximum Aperture of Lenses
Each lens has a minimum and aperture capacity. The lens has specifications on what is the largest or smallest aperture you can get, and this is important to check out before making any investment.
Experts in the field of photography lean towards purchasing a lens that has the maximum aperture. A lens with a wider aperture like f/1.4 is valuable and is considered as a “fast lens.” It is guaranteed to have faster shutter speed, more light comes in and has several effects when it comes to the depth of field. No wonder lenses with higher maximum aperture are more expensive. A lens with a maximum aperture of f/4.0 is already considered a “slow lens.”
When it comes to minimum aperture, photography experts do not make a big fuzz out of this. You see, modern lenses provide a minimum aperture of at least f/16. When you come to think of it, it’s all you’ll ever need. It’s going to be a rare circumstance where you’re going to need a lens with an f-stop higher than that.
So make sure to always check out the maximum aperture before making any purchase. Sometimes it can be seen on the lens itself, and for some brands, the f-stop may be written as f:16 rather than f/16.
Zoom Lenses
When it comes to zoom lenses, the maximum aperture can change upon zooming in and out. For example, if the maximum aperture of a lens is f/3.5, it can shift gradually to f/5.6 focal lengths.
There are expensive zoom lenses that maintain the maximum aperture in their zoom range. At the same time, some of the prime lenses have higher maximum apertures as compared to zoom lenses. That is why prime lenses have more benefits as compared to zoom lenses.
Examples of Aperture Use
By this point, I’m sure you now have a thorough understanding of what an aperture is, how it works, and how it greatly impacts your images. Now it’s to give you an idea of the different f-stops and aperture used.
- f/0.95 to f/1.4: These are the fastest maximum apertures that are available in premium prime lenses only. This allows the most light gathered, making it ideal for any kind of photography. It can be used for indoor photography, lowlight settings, night sky, events, and more.
Since it has a wide f-stop, you can take great shots of the most shallow depth of field even at close distances. This is great for close up photography for small subjects. Have you seen a close-up picture of a snowflake with a blurry background but a sharp subject? This is the kind of f-stop you’re going to need.
- f/1.8 to f/2.0: If you aim to take shots of aesthetically-pleasant photos, these f-stop ranges are not too bad when it comes to its low light capabilities. These are still considered as enthusiast-grade premium lenses that have an adequate depth of field even with subjects at a close distance and will still yield a pleasant bokeh effect.
- f/2.8 to f/4: When it comes to professional-grade and most enthusiast zoom lenses, the f-stops are limited to f/2.8 up to f/4. It may not have the light-gathering capabilities of an f/1.4 premium prime lens, but it has superb image stabilization that can be beneficial and versatile even in low light conditions photo shoots.
The f/2.8 to f/4 aperture range can be considered as an adequate depth of field for general photos subjects for a superbly sharp image outcome. This aperture range is said to be best for sporting events, travel, wildlife, and other types of photography you deem to see fit.
- f/5.6 to f/8: When it comes to architectural, landscape, and group photography, this f-stop range is the ideal choice if the depth of field is not needed. For most lenses, this has the best overall sharpness desirable for different settings.
- f/11 to f/16: Though this is considered as a small aperture, it’s not bad for landscape, architectural, and group photography where the maximum depth of field is needed. When it comes to macro photography, the sharpness of the image starts to lose due to the lens diffraction effect.
- f/22 and smaller: As mentioned earlier, minimum apertures lower than f/22 is not that much necessary. The sharpness of the image is very poor, where most of the time, the whole image is blurry. Photograph experts suggest staying away from f/22 and smaller apertures. A technique when you get to need more depth of field is to move away from the subject or use the focus stacking technique.
To summarize everything we learned when it comes to effects of aperture on your photo, you may refer to this list:
- Brightness or exposure
- Depth of field
- Loss of sharpness because of diffraction
- Loss of sharpness because of the lens quality
- Starburst effects (on lights and the sun)
- Sensor specks of dust are visible
- Focus shift (depending on the lens)
- Focus on lowlight (depending on some conditions)
- Controlled light coming from the flash
What is the Negative Effect of Diffraction?
Lens diffraction refers to an image growing progressively less sharp with smaller apertures starting at f/16. This means that the finest details on a photo begin to blur. This is called the negative effect of diffraction, and is this something photographers like? It’s not.
Understanding the impact of diffraction gives you the idea of how it impacts your shots. You may have the option to choose the sharpest aperture or make an educated decision.
If you’re into landscape photography, every aspect of the photo must be sharp. If you’re thinking of using the smallest aperture like f/22 or smaller, you’re making a wrong decision.
The negative effects of diffraction squeeze the light that comes into the lens. It then interferes, grows blurrier, and results in photos that are noticeably unsharp.
For apertures like f/8, there are already hints of diffraction, but it’s not that noticeable to be bothered. The same is true with f/11 and f/16 that won’t bother you that much. But when it goes beyond the point of f/22, there’s so much detail lost.
Losing a little bit of sharpness using f/11 to f/16 is not that big of a deal, you can have the option to add a depth of field.
How Lens Aberrations Affects Sharpness
Lens aberrations are the imperfection on how the lens focuses the light that it captures. These lens aberrations usually occur due to the rays of the light that passes through the lens and are unable to converge to a single point.
There are different types of lens aberration that affects the magnification, distortion, color, focus, and sharpness of the image. We’ll find out how lens aberrations affect sharpness.
Errors in photography like poor exposure, missed focus, or distracting composition are caused by human error. It’s different from lens aberration because the problem of the image quality is caused by the lens. The lens aberration is an optical problem of the equipment which produces a chromatic problem.
Other problems caused by lens aberration are the lights will look smeared, when zooming or cropping, the image isn’t very clear. Also, it can cause spherical aberration, coma, field curvature, distortion, color grinding, astigmatism, and more. It can be blurrier than usual in certain apertures and can be seen in the corner of the image. Have you seen filters like vignette? It can possibly look like that.
Since the aperture blocks the light entering the lens, and as the aperture gets smaller, it blocks more corners of the lens. Lesser light coming in due to smaller aperture does not produce dark or black corners on the image since the center of a lens can still transmit light to the corner of the camera lens.
When the aperture closes further, more light will be blocked from the side of the lens, and it wouldn’t make it to the corner of the camera sensor. Only the light from the center can pass through.
For example, with an f/stop of f/5.6 with less visible aberration will look much sharper than of an f/1.4. But the question is, how does the aperture balance out with the lens diffraction? How does it harm the sharpness in the opposite direction?
Most photographers got used to the practice that the sharpest apertures used are f/4 up to f/8. These apertures are adequately small to block the light from the corners of the lens. But they’re not that small that may cause problems with diffraction.
Also, take note that there are some aberrations that do not change even when the aperture is adjusted, and some may even get worse. For example, the axial chromatic aberration will cause color fringes near the corner of the frame. This is a normal occurrence due to the small aperture that doesn’t reduce aberrations.
The light is just blocked, and it can’t pass through the edge of the lens. That is why if the edges are not causing the problem, there won’t be any improvement if you stop down.
But it is always best to test this with your own equipment, and a few trial and error photoshoot will never hurt. The art of photography is useless even when you master the fundamentals without putting your skills to test.
Small Aperture and Unwanted Elements
If you use a small aperture to shoot through things like dirty windows, fences, plants, or water droplets on your lens, you might get disappointed. The small apertures ranging from f/11 to f/16 will have a large depth of field that you may end up focusing on unwanted elements on your photo.
For instance, when shooting at a body of water, an f/16 aperture may render a water droplet into the lens, forming an ugly and distinct blob. In cases like these, you are better off using wider apertures like f/5.6 to capture the water droplet and it’s going to be out of focus, and it won’t even appear on the image.
Other than water elements, there are issues of dust as well. When shooting through the dust that is landing on your camera sensor, the lens changes. Dust specks will clearly show at small aperture ranging from f/16 to f/22.
Fortunately, these specks of dust can be removed in editing software like Photoshop or Lightroom. But if there are dozens of specks of dust in one photo, it will surely test your patience. That’s why it’s always important to clean your camera sensor at all times.
But if it’s too late to clean due to time constraints, you can always use wider apertures. These unwanted elements may lead to either a disaster or a masterpiece. Whichever it may lead to, it’s best to always trust your instinct and practice, practice, practice.
Focus Shift Problems
There are some lenses that, even if it’s in manual focus mode if you do not move your focus ring, the point of focus may shift as you use to adjust to smaller apertures. Is this ideal? No, it isn’t.
Focus shift problems are considered a lens aberration problem. It’s not due to human error, and the problem lies in the equipment. The corners of the lens might not focus on the light coming in like the way it does in the center. That’s why by stopping it down, it blocks the light from the edges and the focus point experiences some slight changes.
So how will you know if your lens has focus shift problems? Just follow these steps:
- Use a tripod to place your camera.
- Set your camera lens to manual focus.
- Find a subject with minor details that extend backward, and focus on its center.
- When zooming in on an image, you’re about to take, and you should be able to see pixel-level details and aspects of the photo that are out-of-focus.
- Take a snapshot of the photo using the widest aperture of your lens.
- Progressively try smaller apertures (progressing from f/2, f/2.8. f/4, and so on and so forth).
- Make sure not to move the focus ring
- Double-check that the manual focus is used
- Zoom in up to 100% and look at the screen.
- Check if the sharpest point of focus continues to move farther as you stop down.
- If it moves more, the focus shift issue worsens.
So what do you do in order to compensate for the extreme level of focus shift of your lens? Here’s what you can do:
- If you’re using your camera’s widest aperture, just focus on your subject normally.
- If you’re using wide to medium range apertures (f/2.8 to f/6), enter into live view then focus (this works well for both manual and auto focus).
- For smaller apertures ranging from f/11 to f/16, just focus normally since the depth of field is large enough to cover focus shift problems.
Autofocus System
A mechanism in your camera that won’t work well unless plenty of light enters into it is the autofocus system. When your camera is set in its autofocus system, not the manual focus mode, the focus adjusts on its own.
When your camera is originally set at a small aperture like f/16, the camera will automatically adjust its focus on its own to a larger aperture for up to f/2.8. It may stop down up to f/16 once the camera is clicked.
Just remember that this may not be possible at all times because it depends on the widest aperture of your camera. For instance, if your camera’s widest aperture is only f/5.6 ranging up to f/6.3, the camera can’t use a large aperture to help with the focus.
That is the reason why it’s always best to invest in a lens with the widest aperture up to f/1.6. This may cost way more as compared to regular lenses, but this is an investment worth paying for.
Look for a lens that is able to zoom the lens but still focuses on poor lighting conditions. Wider apertures help in focusing easily; meanwhile, cheaper lenses usually miss to focus in darker rooms.
So whether you’re shooting with an aperture of f/1.4 or f/16, the camera focuses at both aperture at the same time. This is, of course, except for cameras in live view, cameras with an all-manual aperture, or for an old lens.
Landscape photographers may not appreciate this effect, but others may create a masterpiece with this. If you’re using a DSLR, you can enjoy a brighter viewfinder that comes with it since it has a not so bad wide maximum aperture. As mentioned earlier, it’s always a good idea to have advanced focusing capabilities even with extra lowlighting conditions.
Flash Exposure
With strobes or any kind of speed lights, always remember that the aperture has an essential role when it comes to controlling the flash exposure. As contrary to the shutter speed, where it depends on the light coming in.
The flash exposure is affected by the aperture as it only regulates the amount of light coming inside the camera that may record from a flash burst.
Aperture in Videos
Play a film, hit the pause button, and look closely at what aperture it uses. Say, for example, the actor passes, and there are objects behind. You will notice that actors that are close-up usually have a blurry background.
This means that for videos, especially for close-up shooting scenes, wider apertures are used. This is because the actor is the focus, not the person behind. This is not just applicable for films, but maybe for wedding events, with a close-up scene for the couple, a large aperture is used. A shallow depth of field is used for close-up video scenes; the recommended aperture is f/2 ranging to f/5.6.
Bottom Line:
Hopefully, this post has helped you understand more about aperture. I know that this topic about aperture is just too much to take in. But just make sure to remember the concept of using the wide aperture for blurry backgrounds and a small aperture for sharp backgrounds.
Use the wide aperture for dark settings since or poor lighting, and use the small aperture for otherwise. There are many tips in this post that will guide you through your journey of being the best photographer.
The secret to being the best photographer is to invest in quality types of equipment, practice what’s comfortable for you, and of course, have fun!