Image: Jeff P / CC BY 2.0
As photographers, we all know the importance of paying attention to the backgrounds in our compositions, but how much thought do you give to your foregrounds?
The foreground, like the background, is an important part of the photo. The foreground serves as an introduction to an image, helping to set the stage, so to speak, for the rest of the photo. It’s the first thing that grabs our attention and leads us into the scene.
A great foreground can transform a flat, one-dimensional composition into an engaging image that’s full of depth and dimension –one that looks more true to life.
If you’re looking to take your photography to the next level and create amazing images that are full of visual interest, here’s how you can use foreground elements to enhance your photos.
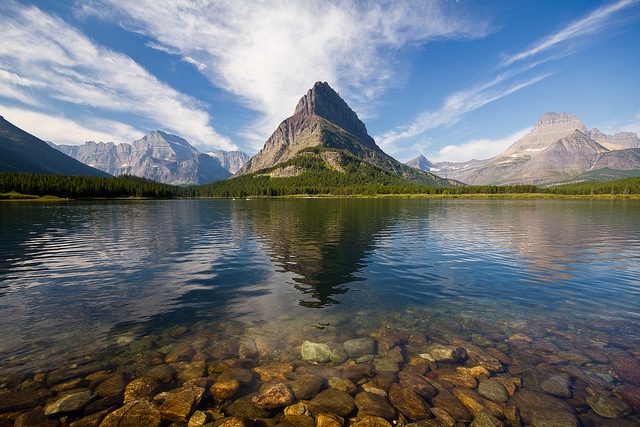
1. Look for Leading Lines
Image: Ian Sane / CC BY 2.0
Leading lines are an excellent compositional element. Including leading lines that start in the foreground, and continue off into the distance is a great way to add a sense of depth and distance to an image. Look for bridges, fences, rivers, fallen logs –or other elements that make great lines.
Keep in mind though, that leading lines aren’t always literal lines, they can also be points of interest that grab your attention and lead your eyes through the photo.
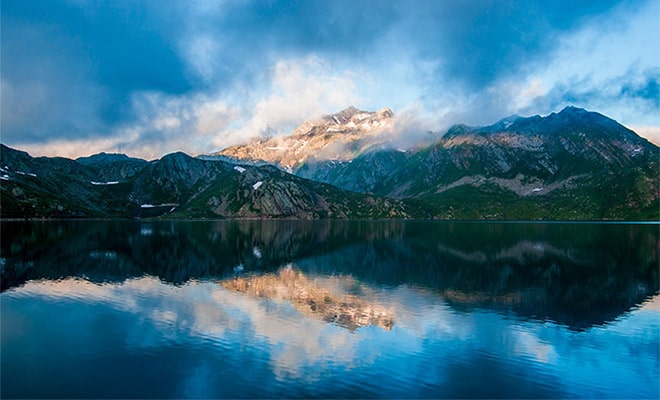
2. Set the Context
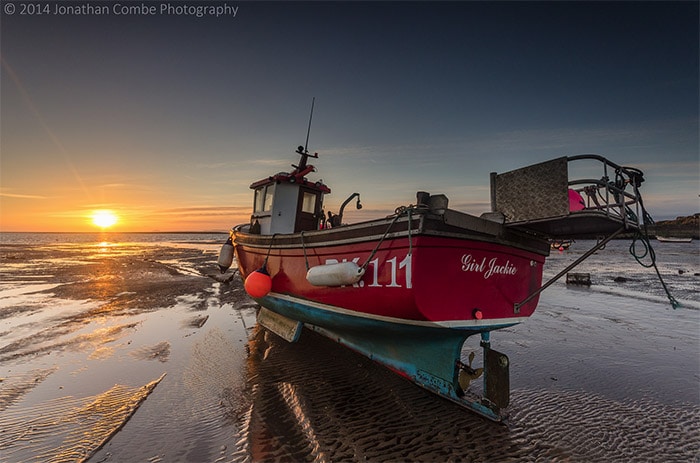
Image: Jonathan Combe / CC BY 2.0
You can use the foreground to help set the stage for the composition. A great foreground will introduce you to a scene and help the image to come alive.
For example, instead of photographing a flat image of a sunset over the sea, add some foreground to help set the context and add depth to the photo. Look to include some seagrass, driftwood, boulders, or pebbles to add more of the setting to the image, and help to draw the viewer in better.
→ Related reading: Tips for Better Sunset Photography
3. Use a Wide Angle

Image: Steve Jurvetson / CC BY 2.0
Wide-angle lenses are the lens of choice when doing landscape photography. One of the best ways to use a wide-angle for landscapes is by getting closer to the ground and looking to include elements in the foreground.
The distortion effect will cause these objects to appear larger, and more prominent, allowing you to create some eye-catching images.
4. Change Your Perspective
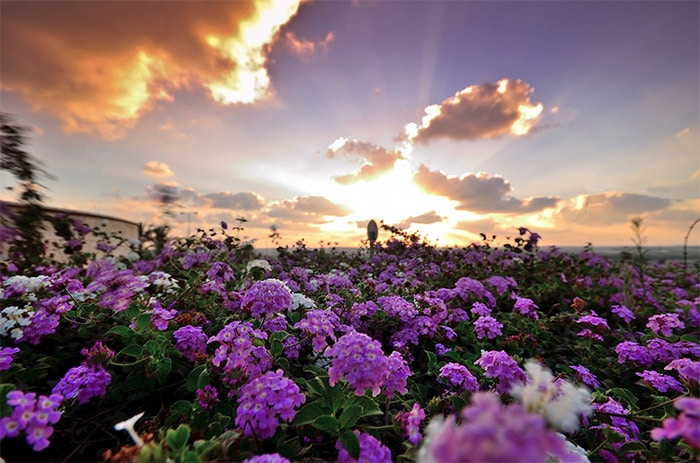
Image: amira_a / CC BY 2.0
If your foreground just isn’t working, don’t be afraid to change your angle, or move to a better location. It sounds basic, but you’d be surprised at how many photos are often taken at the same exact vantage point. Make your landscapes unique! Look for a new perspective, or get down lower include more foreground in.
You could also try tilting the camera up to capture a more dramatic angle and include more of the sky.
→ Related reading: How Perspective Impacts Landscape Photography
5. Create a Frame
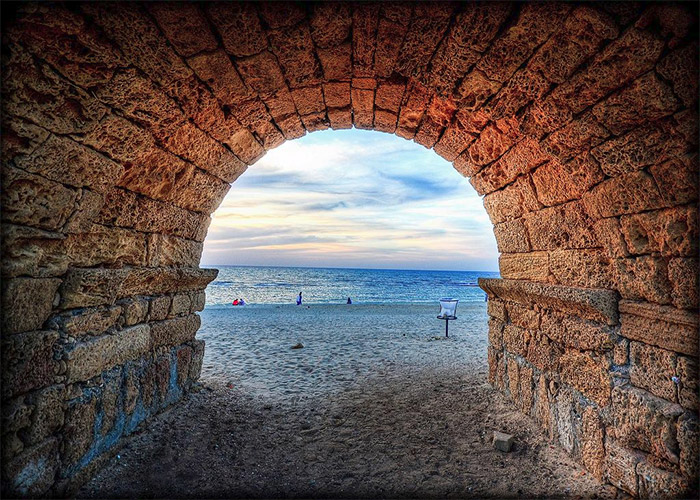
Image: amira_a / CC BY 2.0
Composition includes all elements that are seen in the photograph, whether foreground or background, and whether contained in the frame, cut off, or used as a border. The terms border and frame are often interchangeable, at least in the sense of something being around the outer edges of a photograph.
Usually, the bottom edge of the photograph contains the ground. Of course, there are lots of ways in which this rule can be broken, but in normal circumstances that will be your starting point. This still leaves three sides of the photograph which you can consider in many ways.
Leaving them open, without a visual frame inside the photograph, is certainly one option. This can create a feeling of space, and freedom, in many cases. It can also leave the photograph undefined, however, and can mean that the eye of the viewer wanders aimlessly.
In case where you want to make a certain point, direct their eye to a certain place, or create a different feeling, a frame can help. There are different ways to use a frame, also. Your frame does not have to cover all four edges of the photograph – and it does not have to be the same thing that frames all sides. A clear example of this would be to frame a photograph with the juxtaposition of the natural and man-made world. A tree growing at one side of the image, and a brick wall at the other, will give a strong context to whatever you photograph in the middle of the image.
This composition could include the branches of the tree at the top of the image to box it all in, or leave the sky open to create an impression of height. When you are taking an image, if you are not yet used to framing, it helps to steady yourself and simply glance around. What is on the far left? What is on the far right? You can change the angle of the camera or the position in which you stand to create your frame.
Don’t be afraid to walk around and consider your landscape from different viewpoints, rather than taking the shot as soon as you see it. When you come to the point of creating your frame, it’s important to place your camera very carefully. This is easier with a tripod.
If you are holding the camera in your hands, try to steady yourself with your elbows tucked in against your body. This will reduce the chances of the camera shaking as you press the trigger and moving your frame. If you are struggling with this, you can consider taking a step back or zooming out. When you get your photograph uploaded to your computer, you can always crop it down to a better frame.
Framing is a fun way to add depth to your images. To frame your shot, look for elements that create a natural border around your subject or focal point. Using tree branches as a frame is a popular technique, but you can look for framing opportunities through pieces of driftwood, bridges, or even openings between boulders. You can even create a “frame within a frame” effect by using an arch or a doorway.
6. Natural Frames
What kind of things can you use from the natural world to frame your image? Trees are a very obvious example because they have both height and breadth – creating the exact kind of shape you need to cover both the side and the top of an image.
You can also use trees that form natural archways as an easy way to frame your landscape. You may have to change your angle if the trees are tall: make yourself as tall as possible so that you can shoot downwards, capturing both the landscape and the top of the arch in the same image.
Trees are not the only natural formation you can use. Tall rocks are great for the side of your frame, and you can even use rocky outcrops to form a frame along the bottom of your image. Hills and cliffs can be fantastic for framing the sides of your image as well.
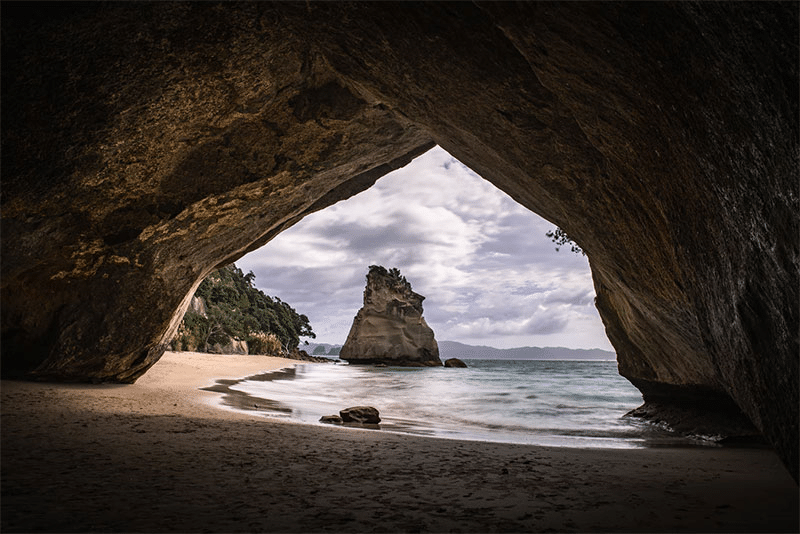
Photo by Casey Horner / CC0
Whatever you can see that is either tall, wide and low, or wide and high, can be used as a frame. You can even look through things – get close to a tree and shoot through the branches, so that they form a twisted frame along all sides.
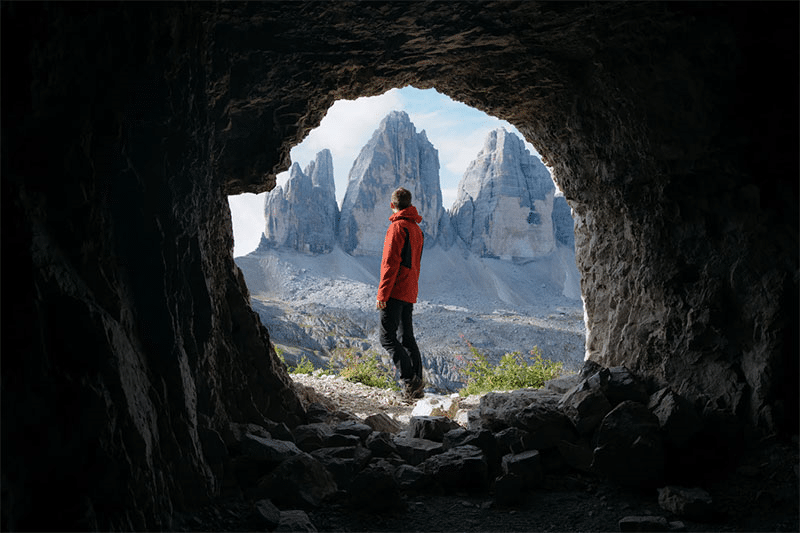
Photo by Simon Migaj / CC0
Natural frames are a great way to really get into a landscape and create a sense of depth. If there are no man-made objects in frame, they can also create a sense of wildness and majesty.
7. Man-made Frames
You can also use man-made items as frames for your landscapes, giving a very different feel and story indeed to your photographs. A window or archway is usually the perfect option, as you can look through them in order to photograph a landscape that lies beyond.
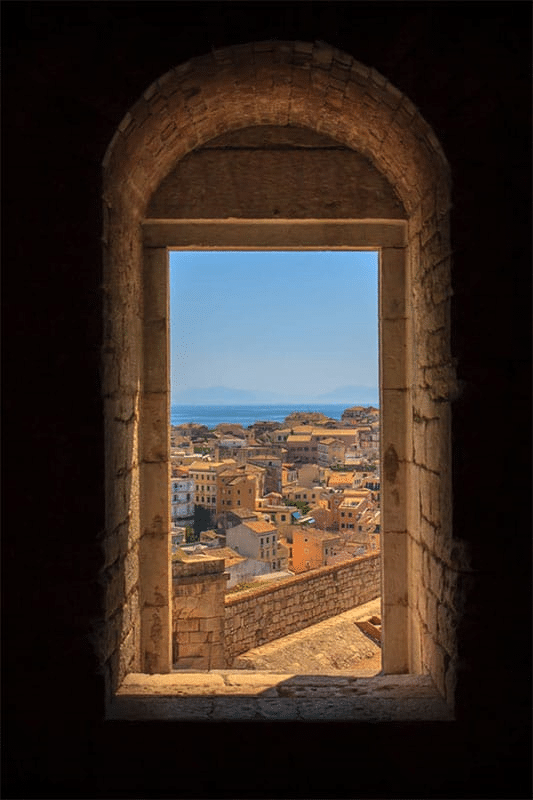
Photo by Dawid Zawila / CC0
Don’t feel limited by this idea, however. You can also use walls, poles, posts, and fences as frames to the side. Road signs, any part of a building, and even vehicles can make great frames.
Even in areas that have been dedicated to nature, you can often find signs, a visitor’s center, a car parking area, and so on which contain man-made elements for you to use. Then there are people themselves, who can stand in strategic places!

Photo by Georgi Nikolov / CC0
A man-made frame gives us the story of man versus nature and can make a point about our impact on the landscape. A crumbling, ruined castle window could tell of the longevity of nature, and the impermanence of man.
A tower block window can tell of our dominance of the landscape, and the loss of natural habitats.
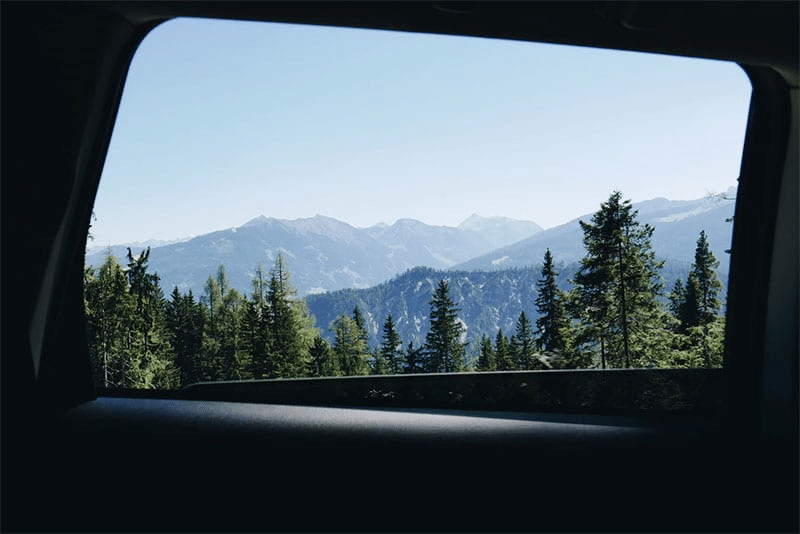
Photo by Paul Hermann / CC0
Choose your frame carefully, and you can tell any story you like. This is a great way to change the meaning of your photograph or give it a more interesting aspect for viewers to admire.
8. Blur the Foreground or the Background
Image: jenny downing / CC BY 2.0
Distracting foregrounds? Blur them out! While some images look best when the whole scene is sharp and in-focus, others can benefit from a softly blurred foreground. Use a wide aperture, or get closer to the foreground to blur it out. Or, consider keeping the foreground sharp, and throwing the background out of focus.
Again, use a wide aperture, but remember, the more distance there is between your main subject and the background, the mort background blur there will be. If you’re too close to the subject though, it could blur, so you may have to take a step back to help draw the foreground into focus.
→ Related reading: How to Create Beautiful Bokeh in Nature Photography
9. Or Keep It in Focus
To capture an image that’s sharp from foreground to background, you’ll want to use a small aperture and a wide lens for a greater depth of field. You’ll also want to find the hyperfocal distance; the point that you should focus on to keep most of your image in focus. Try manually focusing on the furthest object in your scene and then adjust the focusing distance as close as you can while still keeping the background relatively sharp.
Or you can use an app like Field Tools to calculate your hyperfocal distance.
→ Related reading: 11 Steps to Tack-Sharp Landscape Photos
10. Use a Filter
Image: Jeff P / CC BY 2.0
We’ve all dealt with the frustration of photographing an amazing sunset, only to find that the foreground is woefully underexposed. Using a graduated neutral density filter is a great way to balance the exposure between the sky and the foreground, allowing you to get every part of the image properly exposed. A neutral density filter will also come in handy if you’re doing long exposures in the day since it will let you keep the shutter open for longer.
If you’re going to be photographing lakes or other large bodies of water consider a polarizing filter. This filter cuts through the glare on the surface of the water, allowing you to see through the shallows.
→ Related reading: An Intro to Filters for the Landscape Photographer
11. Make It the Focal Point
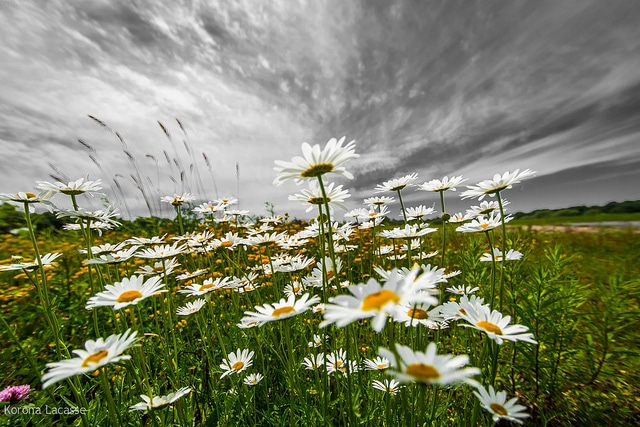
Image: Korona Lacasse / CC BY 2.0
While the foreground is often used to draw your attention through the image, why not make it the main point of interest? In some cases, the foreground is so striking that it demands to be front and center. In this case, it may make more sense to place it as the main focal point in the photo.
12. Consider Contrast
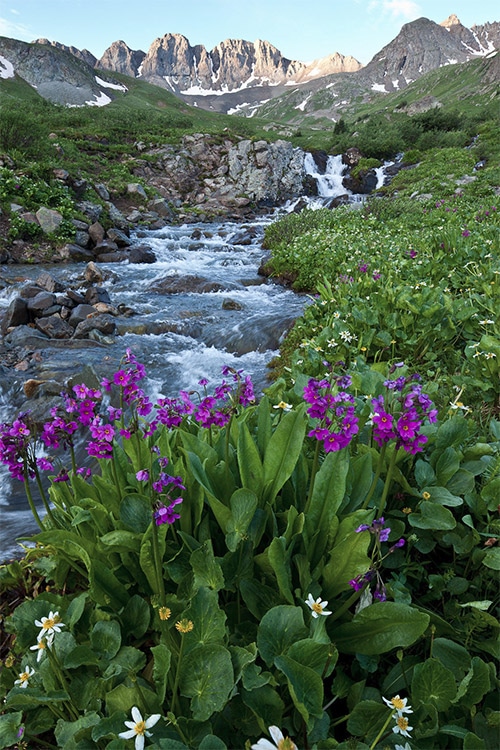
Image: Bureau of Land Management / CC BY 2.0
Contrast is a great tool for creating a dynamic, eye-catching image. Consider looking for ways to create contrast with the foreground and the rest of the photo.
For instance, a smooth, calm ocean can be contrasted with rough, jagged rocks in the foreground. Or a cold, snowy mountain peak can be juxtaposed with spring flowers coming through the earth near the front of the scene.
Or, look for color contrasts. The bright, bold colors of a sunset would contrast well with the dull, muted colors of the rocks on the beach.
Conclusion
As you can see there are plenty of ways that you can use foreground elements to spruce up your compositions. While it’s easy to focus on the main point of interest in the distance, it’s important to remember that your foreground is important as well. Look for ways to use the foreground to enhance the overall composition, and have fun capturing photos that have depth and interest.
Do you try to include foregrounds in your images?
Photo license link: CC BY 2.0