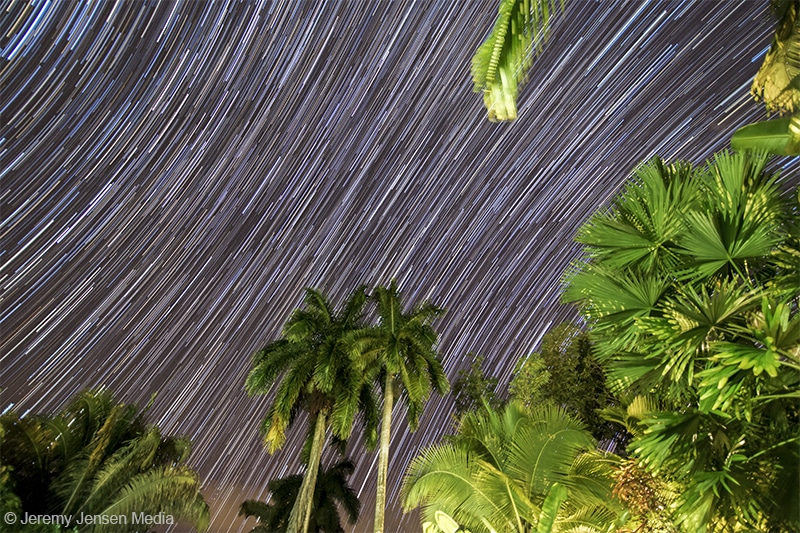
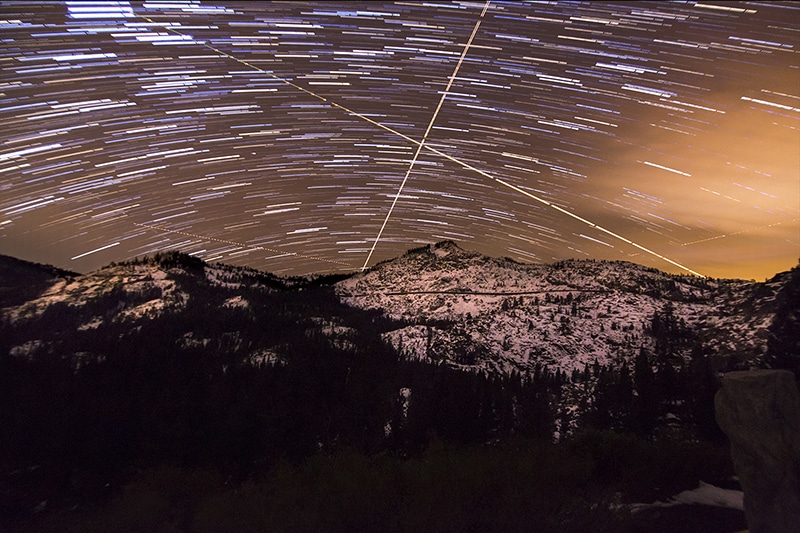
The first time I saw a photo with star trails streaking across the sky, I convinced myself it had to be fake. Not only was it something I would never see in real life, I couldn’t fathom a long-exposure being the technique responsible either. For many of you, you’ve probably come here looking for the same answer, how are star trails captured? Well, you’ve come to the right place, and I promise you it’s much easier than you have been anticipating.
While creating star trails has a lot to do with post-production, knowing how to shoot the stars in the first place is equally as important. Once you can capture the stars, you’ll be using an intervalometer to take a sequence of the stars, which is the trick behind creating the star trails.
→ Related reading: How to Photograph the Night Sky
Shooting The Stars
In order to capture the stars in the first place you’re going to need three things:
1. A Tripod – Most great stars photos aren’t taken handheld, and Image Stabilization is incredibly important.
2. Camera – While you can capture the stars on any DSLR, how the sensor can handle ISO will determine how bright, and how little noise will be in the photo. Full-Frame cameras excel in this category.
3. Fast Wide Angle Lens – Having a lens with a fast aperture will greatly improve how much light can enter your camera at once. Having a wide focal length will allow you to capture a larger scene, in addition to preventing the stars from moving during your long exposure. See our Reviews of the Best Wide Angle Lenses for Canon and Reviews of the Best Wide Angle Lenses for Nikon.
Once all of these variables are in place, you can head out and shoot your first photo.
→ Related reading: Gear and Resources for Night Photography
Camera Settings
The settings I use to capture the stars are usually very similar.
- I keep the aperture wide open
- I use a shutter speed between 13″-30″
- I increase the ISO from anywhere between 3200 and 8000
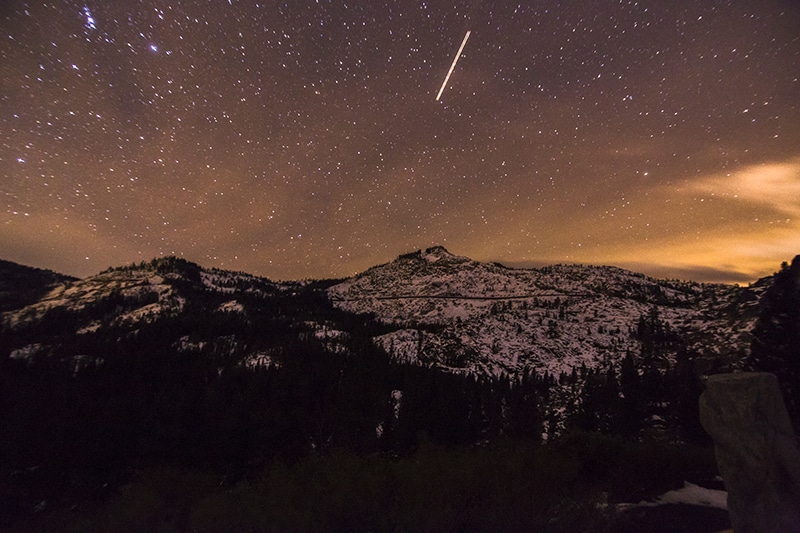
All of these variables will change depending on how much ISO your camera body can handle, and how the exposure looks on your photos. The photo below was captured at F/2.8, 13″ ISO 6400.
Using An Intervalometer
Intervalometers are similar to shutter remotes, in that they allow you to set a custom exposure length and have a timed release. The difference is that they allow you to take hundreds of pictures in a row using a timed interval. This is they key to creating star trails. I will always set the interval on continuous shooting, so when one photo is finished, the other will begin. You’ll want to take at least 50 photos, keeping in mind 50 photos at a 30″ exposure means 25 minutes of being outside, so plan accordingly.
Processing Your Images
Once you’ve captured all of your images, it’s time to have some fun by opening the files in Adobe Photoshop or Adobe Bridge. There is other software capable of stacking images, but I recommend Adobe as they have the most functionality.
If you don’t already have Photoshop you can download a free trial here.
To load your image sequence in Photoshop:
- Go to the File Menu
- Select Scripts
- Load Files Into Stack
- Select all of the images you wish to be stacked
To load your images right from Adobe Bridge:
- Select all of the images you wish to be stacked
- Go to the Tools Menu
- Select Photoshop
- Load files into Photoshop layers…
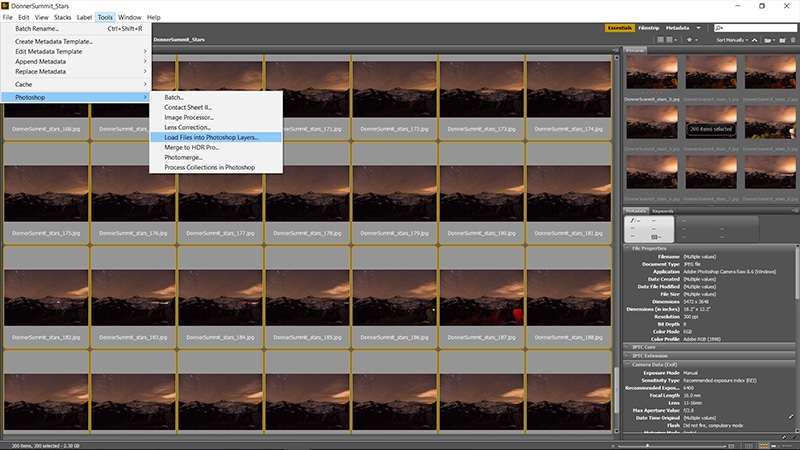
I prefer using Bridge as it allows you to look through all of your images and make determinations about which images will stack the best. For instance, if there was a shooting star, a plane, or a car driving by, the stacked image may have undesirable qualities to it.
→ Related reading: How to Photograph Landscapes at Night
Changing the Layer Type
Once all of your images have loaded into Photoshop (This may take awhile), it’s time to see how your star trails look! To do this:
- Select all of your layers (Select first image + hold shift key + select final image) in the layers panel
- Change the layer type to “Lighten”
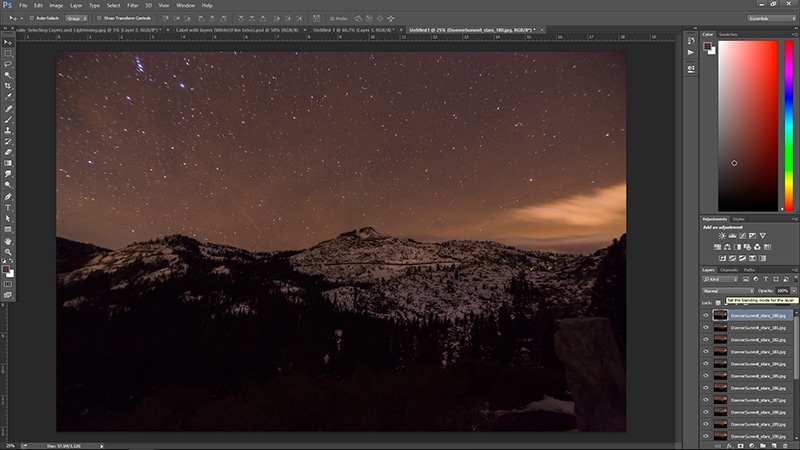
Once you do this, you should get an image like the one below.

Notice how the foreground is now lit up, there’s light from a car driving down the mountain, and there are several streaks across the sky from planes. While some may like how the image came out, this wasn’t exactly what I was going for. So how do we fix this?
There’s a number of things you can do:
- You can go back to Bridge and see which photos have the additional light in them. Then, once you know which files they are you can go back into Photoshop and turn those layers off.
- You can also go back to your files and select less of them to avoid certain images taken during your sequence. This will also affect how your star trails look, notice in the photo below we got rid of some foreground light, but the star trails are now shorter, making them look more like blurs than trails.

- A third way to get rid of unwanted light in the landscape is to select an image you like from the sequence, merge your stacked sequence, and then layer in the new photo.
Star trails will vary drastically depending on how many images you stack. Sometimes the more you stack, the more cluttered the sky becomes. It’s really a matter of experimentation, and personal preferences. Just remember that if you decide to turn certain layers off, try not to turn too many off in the middle of your stack as this will start to leave gaps in your trails. It’s best to pick from either end, and only turn off the ones that have bad overexposures.
If you have any questions, feel free to leave them in the comments. Thanks for reading!


Hi Jeremy, great article. I have Nikon D3200 and I shoot with ISO 1600 but images are lot of noisy. Also, can you suggest some other tools for stacking? Thanks.
Hey Ashvin,
Thank you for reading! As I mentioned above, certain camera bodies are better at handling ISO than others. The Nikon D3200 is a great camera, but it might not be able to handle high ISO settings. If you have noticeable noise I would recommend running a noise reduction filter on the Photo once it’s processed.
I haven’t personally used other software, but I hear DeepSkyStacker works very well. Here’s a link to it: http://deepskystacker.free.fr/english/index.html
Cheers mate,
jeremy