by Sheen Watkins
Magical macro moments exist all around us. It’s only a matter of seeing them–noticing these tiny details that often go unseen, and then capturing them with your camera. These five macro photography techniques will help you interpret the close up world that catches your eye.
The definition of macro photography is where the subject is magnified to life size, or larger. The subject may be something that is very small, such as an insect, or a smaller element of a larger subject.
As you ‘hunt’ for macro subjects, anything can be fair game including humans, pets, nature, interesting objects, elements of larger subjects.
My dog, Qallin, loves to hunt squirrels in our backyard. When he sees one, his eyes glisten as he focuses on the squirrel’s movements in the tree.
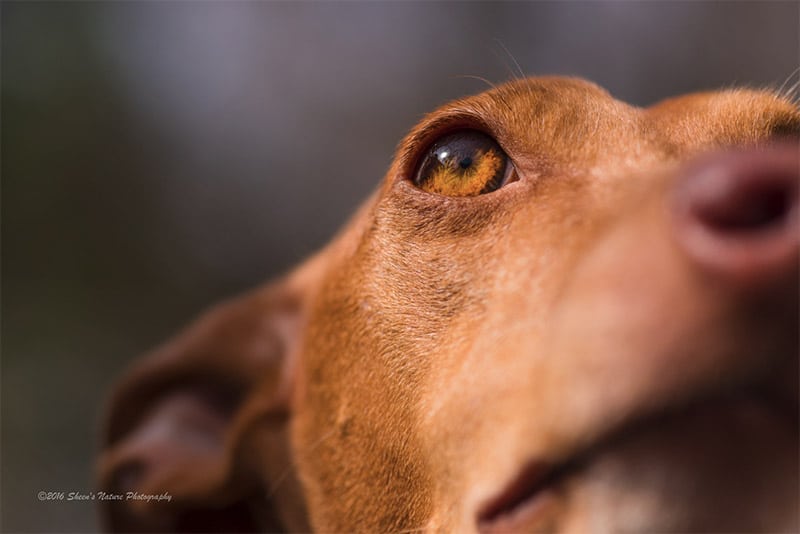
Dog’s Eye in Macro by Sheen Watkins
To emphasize his eye versus his long snout, a very shallow depth of field was used. Settings were f/5 on a 105mm macro lens. I was positioned just under eye level with Qallin. Since he is very active, the shutter speed was a 1/2000 sec.
Macro photography is a personal, up close perspective with your subject. Macro photography techniques and skills evolve as our photography interests change over time. These techniques also vary based on our personal preferences, subjects and tools.
1. Exploring the Tiny Worlds that Surround Us – Inspiring Ideas
As a nature photographer, taking macro images of flowers and insects was an evolution in my photography journey. However, if I were not a nature photographer, what macro images would I take?
It starts with exploring the many, tiny worlds that surround us.
All you have to do is walk into a room, a mall, a garage, an office and many other accessible places. Finding a macro moment is looking for the elements, the small details, the ‘unnoticed’ and making their uniqueness stand out. Here’s a few examples:
Color
If you have children, they may have a coloring book or two along with a box of Crayola crayons. The photo below illustrates the beauty of alignment, color using a subject that may have been found in a back to school kit.
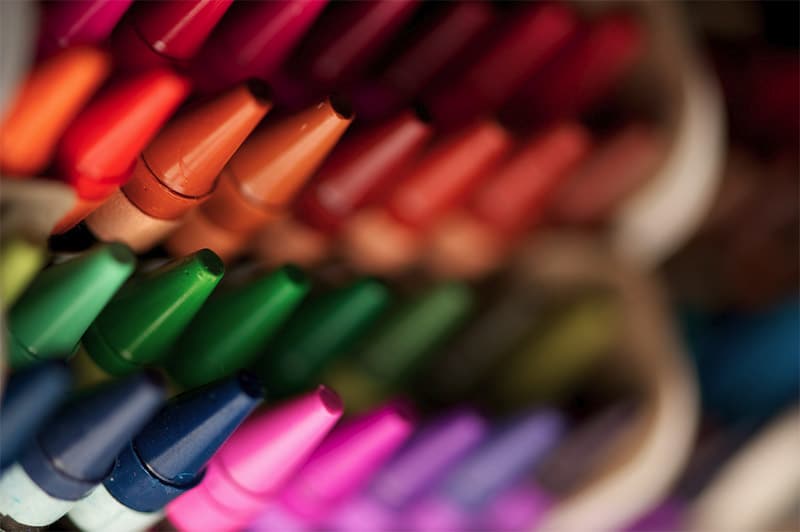
by Dion / CC BY-SA 2.0
Dion created this photo using a 105mm macro and applied a very shallow depth of field (f/3.8). The effect was a softness of sharp crayons with strong colors. The shadows were not quite as extreme since a flash was fired.
Edgy
Walk into a kitchen and a plethora of macro moments can be cooked to your hearts’ content (sorry, couldn’t resist the pun). The fork tines are further complemented by post processing in black and white.

by R. Nial Bradshaw / CC BY 2.0
Nial applied a f/2.8 using a 40mm which balanced the hard lines, sharp contrast of the fork tines as they quickly softened as the eye moves from the focal point. The use of black and white added to the edginess.
Simplicity
A simple piece of jewelry in the palm of a hand creates an elegant macro moment.
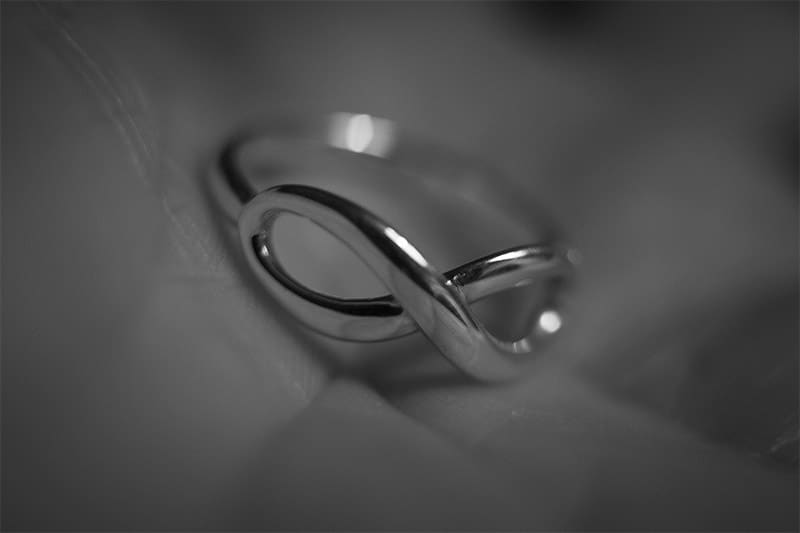
by Mike Beales / CC BY-ND 2.0
The infinity ring was captured using a 35mm focal length and very shallow depth of field f/2.8. Mike’s perspective invites the question, “who’s the lucky recipient”?
Abstract
Walk into a garden to photograph flowers, leaves, ground cover and your eye may be drawn to something not expected. The elements of outdoor decorative art pieces created an abstract macro.
by Cobalt123 / CC BY-SA 2.0
Cobalt took this photo at an art fair in Phoenix, Arizona. Colors, lines and textures were emphasized with a larger depth of field.
Commonplace
If you have some spare change in your pocket, toss it onto a contrasting surface and cast a warm light across them. A macro moment happens with a combination light, texture and shape. In this case, it cost just a few cents. (ok, not really when you factor in the cost of camera equipment).

by Steven Guzzardi / CC BY-ND 2.0
Finding a macro subject is within reach of your camera, your eye, sometimes what’s in your pocket and imagination.
2. Tips to Guide Macro Composition
You’ve chosen an subject to photograph. What is it that interests you? Is it the display of multiple colors in a fading line? An unusual pattern of petals or leaves? Is it the dramatic shadows surrounding the area?
These sample questions can help guide your composition as you’re studying your subject:
- Take a few moments to study your subject from different angles. What looks best? Eye level, from below, above, right side, left side?
- What is the feature that you want to emphasize?
- How does the surrounding area complement/contrast with the subject?
- What branches, dead leaves and other distractions need to be removed before shooting?
- What direction of lighting works best?
- Should the focal point be in the center? Should the ‘rule’ of thirds be applied?
The answers to the questions above happen at the time of image capture and in post processing. Check composition on the playback screen and make adjustments as you go.
Tip: Having a bit of extra space surrounding your subject will add flexibility in post processing.
In the dandelion image below, the water droplet glistened from a distance. The droplet being underneath the flower vs. on top added interest and was the desired focal point. Using only a portion of the dandelion in the final image placed more emphasis on the water droplet.
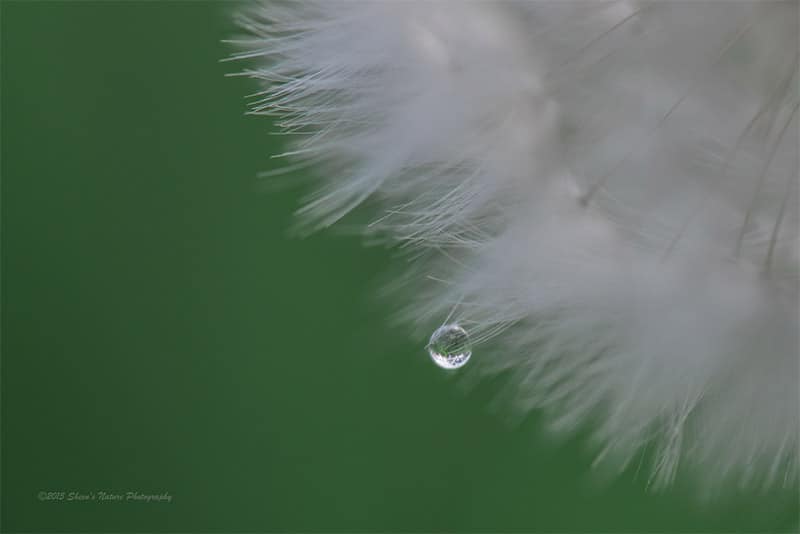
by Sheen Watkins
3. Use Multiple Settings on A Single Subject
Since macro photography is an extreme close up view, the details are important. An artistic detail that can enhance or detract from your subject is depth of field. Depth of field is how much of the area is in focus versus not in focus. Too much in focus, the impact of a feature is minimized. Too little in focus and the eye may see a blurred photograph.
Understanding your specific lens and how it looks at the most shallow depth of field (low f/stop number) to a larger depth of field (higher f/stop number) takes practice, patience and a lot of images.
Using Aperture Priority mode, take multiple images starting with a shallow depth of field (low f/stop number) and work up to a narrower depth of field. There are some subjects that will work beautifully at an f/3.5 and some that will work better at an f/8, f/9 or larger. This is a repeatable, routine process that can be applied as you work different angles of your subject.
When working with a subject consider bracketing exposures (BKT on Nikon, AEB on Canon). By turning bracketing on, you can take multiple exposures of the same image using the same aperture setting. The bracketing feature will automatically adjust the shutter speed in order to produce multiple images at the selected exposure, decreased exposure and increased exposure. Different cameras have varying options so you may want to check your camera manual.
Bracketed images provide more post processing options in the event the lighting conditions are a bit tricky. They can also be merged in post processing for creating HDR images.
Helpful articles:

by Sheen Watkins
4. Take Advantage of the Available Tools to Improve Macro Image Quality
There are tools that can positively impact the quality of your macro image. A few of these include:
- Macro lenses – these specialty lenses are designed for photographing small subjects at very close ranges. This allows you to fill the frame with your subject and capture more detail. Focal lengths range from 40mm up to 200mm. See our Reviews of the Best Macro Lenses for Canon and Reviews of the Best Macro Lenses for Nikon.
- Camera stabilization – tripods are available in varying heights, materials and sizes. In addition to standard, general purpose tripods, there are tabletop tripods that also work for short subjects outdoors. I’ve recently found The Skimmer Ground Pod II. This flat, lightweight disc can be used with a gimbal head or a ball head and allows you to get ground level with your subjects without getting your camera dirty or wet.
- Remote cable release – in addition to minimizing shutter shake, the remote cable release can also free you from being behind the camera in the event you need to hold a light reflector or light shield.
5. Post Processing Techniques for Photography
Post processing workflows are as individualized as the photographer. With macro photography, image flaws that may not have been observed at time of capture may stand out dramatically once on the screen.
- Shoot in raw – a raw file is a record of what the camera’s sensor saw. All of the image data is captured to be worked with in post processing. This provides control over every aspect of the image – color, highlights, tone, temperature, etc.
- Use image processing software – there are many post processing software tools and plug ins that you can use to bring your images to life. Research, ask other photographers and take advantage of free trials to see which option works with your style and budget.
- Apply lens correction at the time of import – some image processing software tools have lens profile correction capabilities that can be applied at the time of import. This corrects lens issues that may be specific to a given lens including distortion, chromatic aberration, vignetting and perspective correction.
- Magnify and survey your image – start by inspecting your selected image using the normal view. Magnify to at least a 1:1 perspective to survey image quality, sharpness, sensor noise, sensor dust and distractions.
- Clean your image – Eliminate spots caused by sensor dust and other distractions.
- Minimize sensor noise (if needed) – different cameras and different settings may make sensor noise more visible giving a grainy appearance. Make slight adjustments when reducing noise. Work at a 1:1 magnification level to see changes as adjustments are applied.
- Crop to desired composition – If moving from Lightroom to Photoshop, I “uncrop” so that I can work on the entire image. After applying creative adjustments in Lightroom and/or Photoshop, I will crop after my edits are final.
- Apply creative adjustments – temperature, tone, color, clarity, sharpening,
Macro photography brings an awareness of details to viewers that may not typically be observed in daily life. It is your imagination that initiates finding a subject and translating it to a final image.
Photo license links: CC BY 2.0, CC BY-SA 2.0, CC BY-ND 2.0


Thanks for this great article on macro photography.very informative and interesting ideas to choose various different subjects other then flowers and insects.
Thank you Jaiku!
Hi sheen.
It is my understanding that “macro” photography means the subject must be no larger than the sensor, or 1: 1 magnification or better. Your photo of the dog’s face does not go close to this requirement unless it is a very very small dog. Of the other photos presented I would suggest that only the drop of water on the dandelion is true macro.
Technically, you’re right but in practice 1:1 is more of a guideline than a rule. Some folks call anything short of that target, close-up but I’m not sure it really matters what you call it.