Photo by skeeze / CC0
What’s the only thing more beautiful in the night sky than a full moon? The Milky Way, of course! This Intro to Astrophotography guide is designed to introduce you to everything you need to know in order get started with astrophotography.
There are 300 billion stars in our galaxy, yet “only” 9500 or so are visible from Earth with a naked eye, and only half of those being visible from either hemisphere. Enter the cities and all the light pollution, you’re only seeing a few dozen or a few hundred stars at a time.
Nonetheless, gazing up on the starry abyss is a venerating, truly unique feeling of awe. Capturing that with a camera, which can see a lot more stars than the human eye, is a particularly rewarding type of photography.
Every year, we see more and more photographers are becoming interested in astrophotography. What’s more, I personally know a few people who bought themselves a DSLR and became photographers solely because they wanted to shoot astrophotography. At the same time, and in no coincidence, consumer camera equipment has reached levels of performance once reserved for professionals only.
Note that this article will be mainly focused on nightscape style of astrophotography and not deep-space photography of nebulas and galaxies, though we will touch on those too. For now, we will cover the basics: everything you need to know to get started with astrophotography, recommended gear and shooting techniques as well as other useful tips. On the same subject, you might be interested in the Practical Guide to Photographing the Moon.
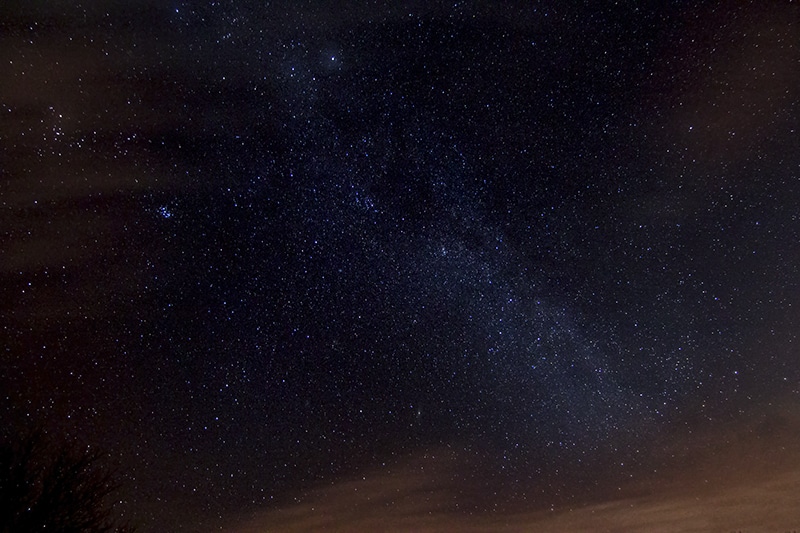
Photo by Anes Mulalic
Location & Direction
The first and foremost requirement for proper nightscape astrophotography is no doubt finding the right location. I cannot stress this enough, as shooting from a bad spot will ruin every attempt at capturing the night sky, no matter how expensive your equipment is. The problem, of course, is light pollution. You want to get as far away as possible from urban centers. Check this light pollution map to find a suitable location.
If you want to capture a specific part of the night sky, you can use an App such as SkyView® Free to determine the exact position of certain celestial bodies. I use it to locate the Milky Way galaxy core when it is not apparent with the naked eye.
Timing & Weather
To get the best possible results you’ll want to a clear sky. This means you’ll want to choose a cloudless night, as clouds will most likely ruin your photos as much as light pollution.
You’ll also want to watch for moon phases. Look for a night when the Moon is in the Crescent phase with low illumination, as a half-moon or worse yet a full moon will pollute the sky with too much light. Check the Moon phases calendar for more information.
Tips for Best Results
Shoot in RAW
Post-processing your photos yourself in software such as Lightroom will go a long way towards removing noise, increasing details and making your photos much more impressive.
Use the largest aperture.
Set your lens to the fastest aperture (lowest F number) it has.
Use long-exposure
Use the slowest shutter speed you can without causing star trailing (see the guide below).
Play with ISO
From there, gradually increase ISO until you hit the level of exposure you’re satisfied with. In a setup with an average ASP-C camera and 18mm F/3.5 kit lens, you’d likely move between ISO800 and ISO3200, depending on environmental conditions.
Focus – this is important
Make sure your lens is properly focused on the stars. This is can be a bit tricky depending on the lens you’re using. Manual focus is your safest bet, but not all lenses have a clearly defined “infinity” point within the focusing ring. If you’re having trouble finding focus, you can try to auto-focus on some other (preferably distant) light source and then reorient the camera to desired composition, with focus locked, taking the shot at the stars.
Star Trails
Star trailing occurs in long exposure astrophotography. While the shutter is open, the Earth rotates, and stars move, thus creating a star-trail effect. This can produce a cool sky-painting effect but ordinarily you’ll want to avoid it. Choosing the optimal shutter speed value depends on several factors, but mainly it’s a matter of focal length. To put it simply, the shorter the focal length the less you must worry about star trails.
As a general guiding rule, use this calculate the optimal shutter speed value:
If you have a full-frame camera, take the number 500 and divide it with focal length of your lens, e.g. 500/18mm = 27.7. That means the optimal shutter speed should be around 27s. For APS-C sensors, do the same but use the number 300 instead.

Photo by Anes Mulalic
Gear
Minimum:
- Any camera with Manual Exposure mode
- A tripod
Recommended:
- Interchangeable-lens Camera (Mirrorless, DSLR)
- Fast, wide-angle lens (18mm or wider, F/2.8 or faster)
Optional:
- Star Tracking hardware
Lens
As with almost any type of photography, the lens is far more important than the camera body. You want a fast, large-aperture lens (F2.8 or larger) that will allow you to collect a lot of light without relying too much on long exposures or high ISO. This lens can be a wide angle or a telephoto, though I would recommend the former for beginners.
Apart from aperture, a crucial characteristic of a good astrophotography lens is the capability to manually lock focus to infinity. One would think this is a trivial feature, but you’d be surprised how many lenses are limited in this aspect.
Tamron 11-16mm F/2.8 AF is one of the most popular ASP-C lens for astrophotography. It is reasonably priced, sharp, fairly fast and most importantly, has a manual focus ring with a clearly marked infinity focus point.
Here are some other affordable lenses you might want to consider. They all show great results in astrophotography:
- Rokinon 14mm F/2.8 (APS-C & Full-Frame)
- Sigma 35mm f/1.4 (APS-C & Full-Frame)
- Rokinon 16mm F/2.0 (APS-C)
Camera
Let’s explain these further. Manual Exposure mode (M) is usually found on DSLRs and some Point-and-Shoot cameras. It allows you to manually adjust various camera shooting parameters. Namely, shutter speed, aperture and ISO. If you can change these on your camera, you’re good to go. Along with a tripod, that’s the bare minimum you’ll need to capture a decent number of stars in the night sky.
Note that many of the modern smartphone have camera apps that also allow you to change exposure settings manually. And yes, this means that you can even use a smartphone for astrophotography, provided that the smartphone camera allows for sufficiently long shutter speeds.
With that said, both smartphones and the majority of Point-and-Shoot cameras have relatively small sensors (most commonly 1/2.3” CMOS) which are limited in performance. Such a small sensor cannot gather a lot of light and has poor noise handling at high ISO settings.
To capture clean, sharp and detailed photos of the night sky you should use a camera with a larger sensor, such an APS-C or Full-frame (35mm equivalent) camera. Even then there are cameras that are better than others due to the way their sensor is built.
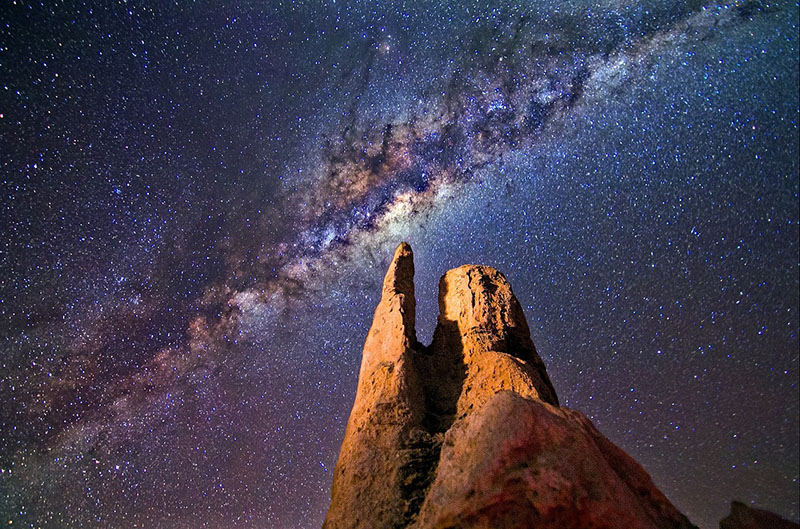
Deep Space Astrophotography
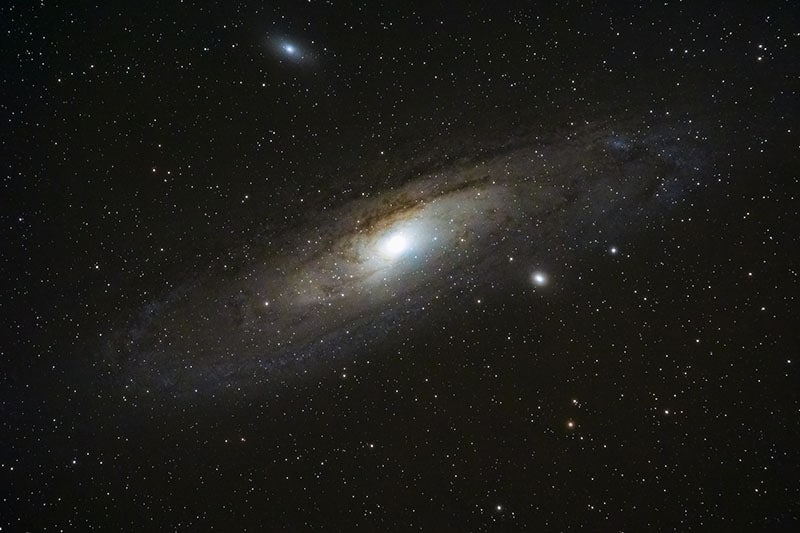
Photo by Bryan Goff / CC0
Now that we’ve covered the basics we can talk a bit about deep space astrophotography. It is possible to capture breathtaking photos of distant galaxies and nebulas, even with an average DSLR camera, though it will require more gear investment.
Obviously, you’re going to need a fast telephoto with a focal length large enough to zoom into deep space bodies. Of course, that kind of focal length will drastically increase the star trailing problem. That’s where Star Tracking hardware comes into play.
Star tracking is used to continuously rotate the camera in parallel to star movement. This allows photographers to use large focal lengths and/or very long shutter speeds without causing the star trailing effect.
If you’re interested in deep space photography or would simply like to get the most out of your current setup, consider purchasing a star tracking system or building one yourself. There are great tutorials online for DIY star tracking solutions. For an affordable, straightforward solution, iOptron’s SkyTracker Pro might be an interesting option.
That about covers all you need to know to get started with shooting for the stars. If you’ve got some interesting astrophotography photos of your own, feel free to share in the comments below.