By Sheen’s Nature Photography
When working with landscapes, focus stacking is a powerful approach in creating sharp images from foreground to the background. Focus stacking is a technique used to increase how much detail appears in focus in an image. The two key steps in the process include 1) Taking multiple photos of the same scene, but with each snap of the shutter you are using a different focus point and 2) Combining or merging the images into one using Photoshop that pulls in all of the areas in focus. (If you don’t already have Photoshop you can download a free trial here.)
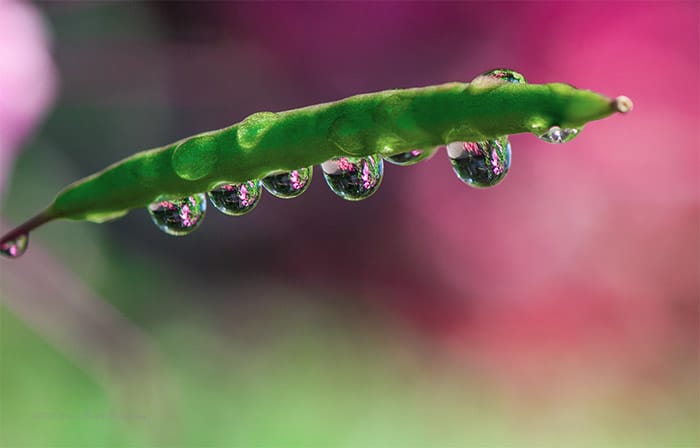
Focus stacking is commonly used in macro photography as illustrated in the photo below. The water droplet image was created by combining four individual raw files in Photoshop. Each water droplet was focused on separately.
The Advantages of Focus Stacking
The benefits of focus stacking include deepening (maximizing) the depth-of-field of an image. Focus stacking can also reduce the loss of image sharpness that may result from the effects of diffraction that may occur when using an increased f-stop number (smaller aperture). Diffraction is a loss of sharpness or resolution caused by photographing with smaller apertures/less light.
→ Related reading: 11 Steps to Tack Sharp Landscape Photos
When to Use Focus Stacking in Landscapes
Not all landscape images require or need the work of focus stacking. For short, mid-range focal length lenses and telephoto distances, focus stacking will provide sharper points throughout the image. I tend to use focus stacking more in these distances than wide angles.
When working with wide angle lenses and super-wide angle lenses, focus stacking can be used but may not be as noticeable due to the fact that these distances naturally have a larger depth of field. I’ve used focus stacking with extra wide lenses in those rare occasions I wanted something outside of the hyperfocal distance in focus. For more information on using hyperfocal distance check out: What Is Hyperfocal Distance And How Can It Sharpen Your Landscape Photography?
How to Create a Focus Stacked Image
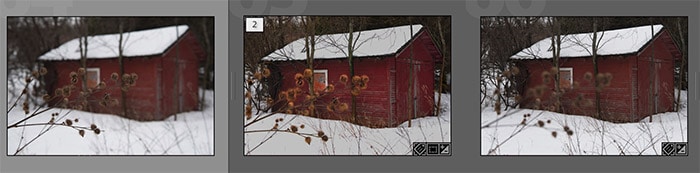
The middle image below is the merged file from the files on the right and left that were taken using a different focus point. Using a 24-70mm 2.8 lens, the f/stop was set at f/7.1. This aperture created a soft foreground when focused on the orange window (image on the left), and then created a very soft background when focused on the dried foliage. The center file is for illustration purposes before major post processing was applied.
By Sheen’s Nature Photography
- With focus stacking, each image should be as close to identical as possible. A tripod is a must and using a remote cable release is an added plus to minimize camera/shutter shake.
- Identify 2 – 3 different areas of the image to focus on. In landscapes, the foreground, the middle area and then the background usually suffice. Sometimes it may be just a couple of points.
- Ensure that your camera is level. The virtual horizon can be viewed in live view mode. This will show both vertical and horizontal alignment.
- With a level tripod, move your focus point to the desired areas of the photo you want in focus and take the pictures using the same f/stop.
- In post processing, open the files in Photoshop. Move all files into one window, each file will become a layer.
- Select all layers then Edit, Auto-align the layers, then Auto-blend.
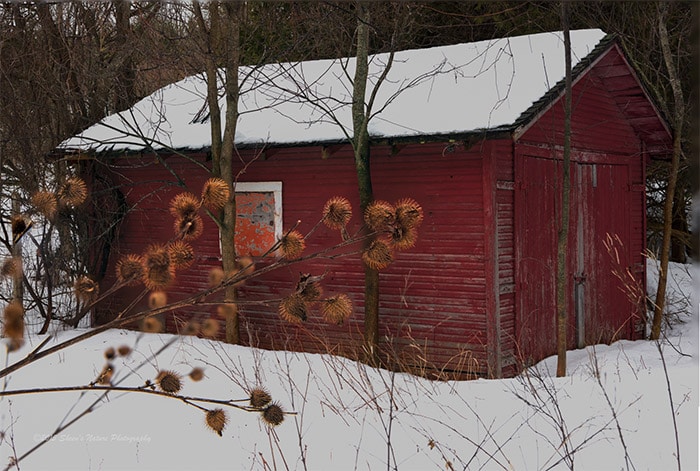
The outcome is a photograph that has the desired sharp details of both the dried foliage and the rusty metal window covering. With additional post processing of the image, the outcome includes rich tones framed with snow.
By Sheen’s Nature Photography
To try a focus stacking exercise at home, take 3 multicolored pieces of fruit and place them on a table at a diagonal. Using a relatively large aperture/shallow depth of field, take three photos and move the focus point to each piece of fruit. Load into Photoshop and follow the steps above. The good news is that the blending process becomes second nature after practicing a few times. That means less time in front of the computer and more time in the field.