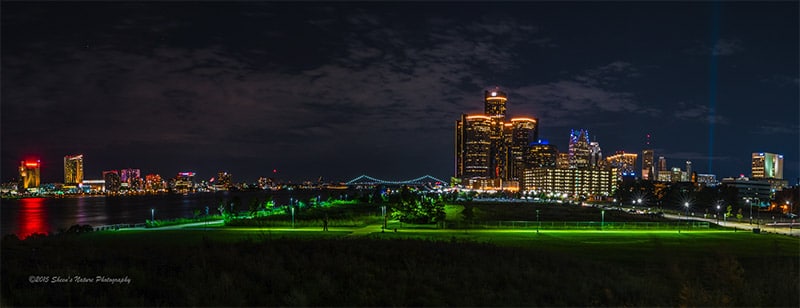
Detroit by Sheen Watkins
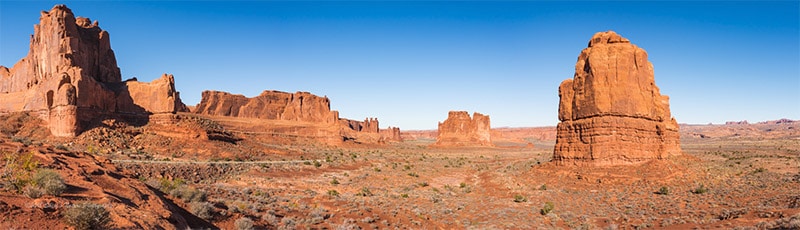
Big mountain ranges span the horizon. City views with bridges and buildings shimmer at night. Soft horizons with a minimalist touch sooth the eyes and calm the soul. Dramatic panorama images are easy to create using today’s tools and post processing software.
Panoramic photography is a technique that captures images with a very long, horizontal or elongated view. This elongated field of view is known as a wide aspect ratio. Wide aspect ratio refers to the width being significantly greater than the height.
An aspect ratio of 4:1 would indicate that the width is four times the height. A 4:1 ratio example would be an image that is 24 inches wide and 6 inches tall. Commonly used aspect ratios include 2:1, 3:1, 4:1 and 5:1.
Panoramic images can be created by stitching a series of images together using 1) planning and photography techniques 2) the right equipment combined with 3) post processing or by cropping a standard image.
Note: Some cameras also have built-in panorama capabilities where the image is created at the time of image capture.
1. Planning & Technique for Panoramas
Planning
A panorama image is stitched together from a consecutive series of photos across a subject area. When planning to photograph a panorama image begin with the end in mind.
Consider the following three questions:
- As you are composing the image, what is the starting point and what is the end point?
- How much room of extra space is at the top of the image?
- How much extra space is at the bottom of the image?
The automatic blending and stitching of images occurs where they overlap in post processing. Images are automatically cropped from the top and bottom. Having extra space on the top and bottom prevents your subject from being cut out of the image.
The example below illustrates a panorama that did not have enough room at the top of the image. Everything made it into the image, but it’s too tight at the top. The left side of the image did not have enough room when compared to the right side. The impact of the panorama is lost.
Technique
The following approach will help optimize a clean stitching process.
- Establish your focus point & distance using autofocus. Switch to manual mode to maintain consistency across the series of images.
- Photograph past the starting point of the subject range to leave room for cropping. I typically prefer to work from right to left. (Left to right would work as well).
- After photographing a segment of the panorama image, rotate the camera to the left and take the second image. An overlap of roughly 25% – 40% is suggested.
- Repeat the rotate and overlap steps as you move across your subject. Remember to leave extra on the left side for cropping too.
2. Using the Right Tools
The right tools for panoramas are the right tools for many photography situations. They include:
- Tripod – A level tripod is a critical tool for stability, alignment and accurate stitching.
- Leveling tool – Many DSLR models have a virtual horizon indicator for the horizon line and vertical pitch. There are also leveling tools built in to some tripods. Small levelers that you can place on top of your camera is another option.
- Remote cable release – In low light or low shutter speed situations, a remote cable release will minimize shutter shake.

Photo by Andy Maw / CC BY-SA 2.0
Note: Rotate your camera to cover the targeted area before taking photos of the series. If your virtual horizon or leveling tool remains level across the range, you are ready to go. If not, make the needed adjustments to ensure the camera is level.
3. Post Processing/Image Stitching
There are multiple post processing applications that will stitch images together. As a long term Lightoom CC and Photoshop CC user, I’ve found that both applications stitch images together cleanly and quickly.
In Lightroom CC, select the images that you’ve identified for stitching together. Go to Photo > Photo Merge and then select Panorama. Lightroom will read the files, look for optimal areas to overlap and stitch the images into one panorama.
In Photoshop CC, the Photoshop, choose File > Automate > Photomerge option can be used to select and merge images into a panorama.
After the image has been merged into a panorama, continue with your post processing preferences.
Related video: How to Merge a Panorama in Lightroom
Another Panorama Option: Cropping a Standard Image
A single image can also be cropped to a wide aspect view ratio. Using your post processing software, crop to the desired wide aspect ratio during the editing process.
In Lightroom CC, select the cropping tool and click on the small lock to see pre-populated cropping ratios. Select a ratio from this list or manually enter your own such as 1:4 for a wide aspect ratio.
The image below was taken at sunset near our house. I had my camera in the back seat and snapped a photo because the color was stunning. There wasn’t a foreground, middle ground or background. There was nothing in the image but color. I didn’t like the image on the screen initially as it felt flat. I changed the image to a wider aspect ratio using Lightroom.

Photo by Sheen Watkins
Panoramas add artistic flair to a wall. Home offices, businesses, hallways and blank wall spaces become standout statements with a panoramic piece.